Welcome To OurGroupOnline!
This User Guide will show you how to use all of OurGroupOnline's capabilities.
Click on the << Back and Next >> links at the top (and bottom) of each page to browse in a logical order. On a touch screen device, like a cell phone or tablet, you can swipe right or left to do the same thing.
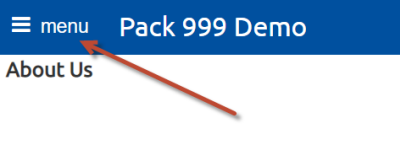
Click the menu icon  in the upper left corner to go directly to a different chapter or page.
You can search the entire User Guide from the search window in the upper right corner of the page. So, as shown below, if we enter "patrol" and click the magnifying glass icon, the system will return a list of pages that talk about patrols.

We use Google Search to return a list of pages that most closely match your criteria.
Use the Print This Chapter link at the bottom of the page to view the current chapter in a new window, without the heading or menu, and invoke your browser's print function.
Going To Your Website For The First Time
The leader who purchased your group's subscription to OurGroupOnline will receive two e-mails within 36 hours of placing the order. The first will contain a link to your website and the leader's User ID; the second will contain the leader's password.
You will also find a link to your site at http://www.OurGroupOnline.org.
The first time you visit your site the home page will look like this:
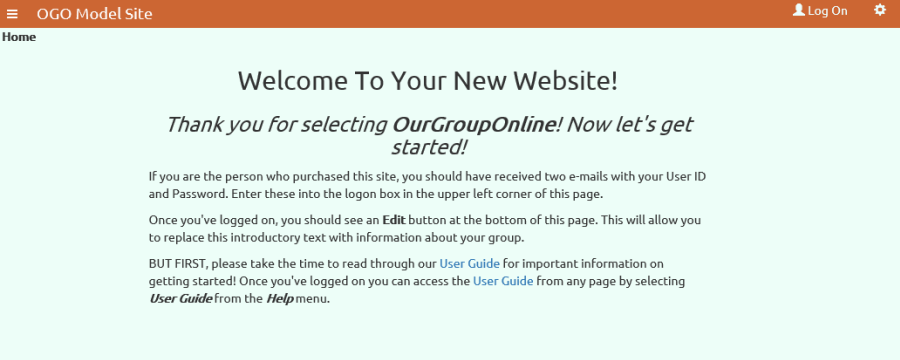
But that isn't how it's going to look after you start working on it!
After you've read through the instructions on this page, log on to your site and start editing your home page.
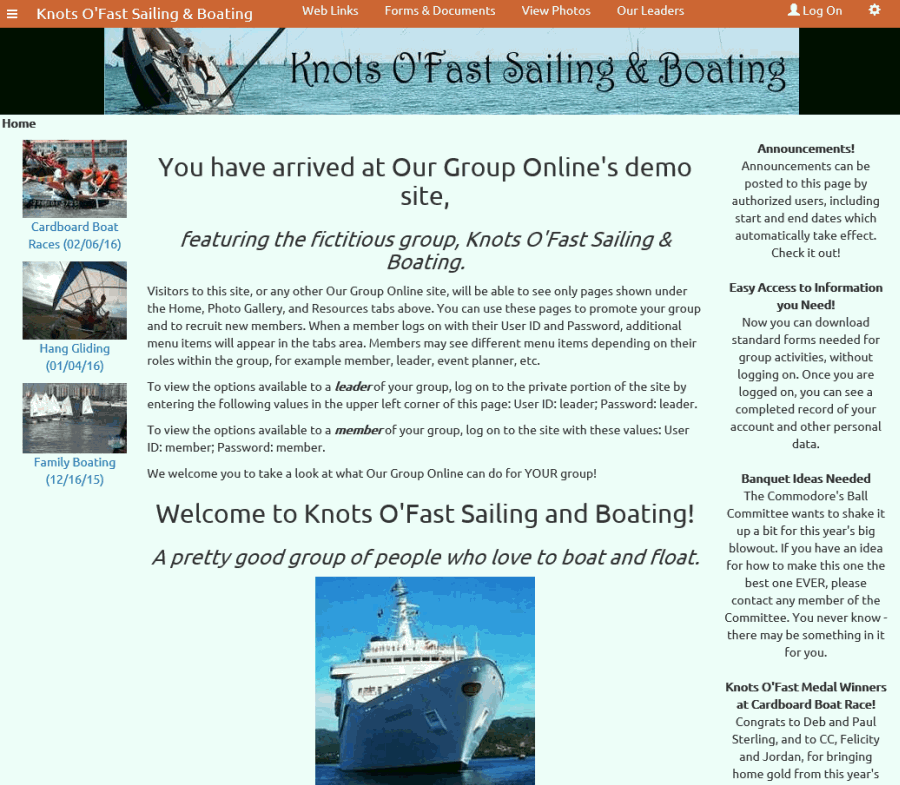
Soon it will look more like this:
Creating A Custom URL For Your Group
Your group's website will be assigned a URL within the OurGroupOnline.org domain, like this:
http://www.OurGroupOnline.org/Mighty468Chicago
The last part of the URL, in this example Mighty468Chicago, is specific to your group.
Many groups want to purchase their own URL to make it easier for their members to remember how to get to their site.
There are many domain registrars from whom you can purchase a URL. We're going to use GoDaddy as an example, but there are many others for you to choose from.
Once you purchase your URL, you will then want to set it up to forward to your OurGroupOnline website. This will allow your users to use your custom URL to go directly to your OurGroupOnline home page.
As an example, we are going to show you how to forward a custom URL, www.Mighty468.org to go to http://www.OurGroupOnline.org/Mighty468Chicago.
If you purchased your URL from GoDaddy™, you will need to log on to your GoDaddy account at www.GoDaddy.com.
Once you are logged on, select Domain Management from the Domains menu, as shown below:
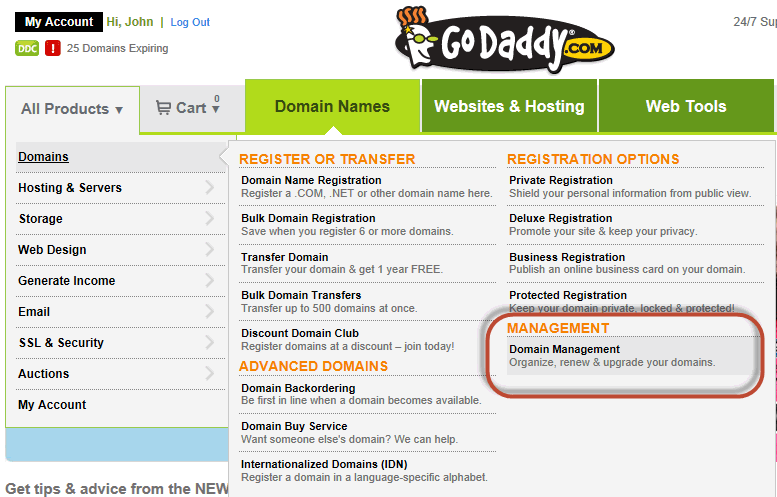
This will display a list of the domains you have purchased from this account.

Click on the domain that you wish to forward to OurGroupOnline. This will display the Domain Details page as shown below.
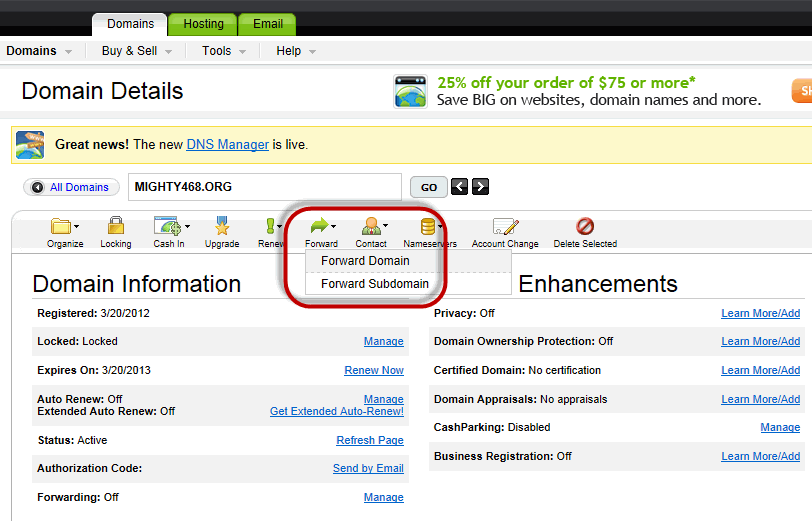
Click on the Forward button. This will cause a drop-down menu to appear. Click on Forward Domain.
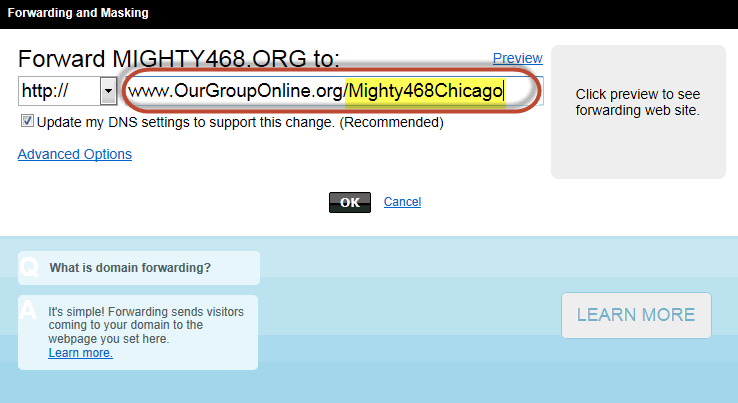
Enter your OurGroupOnline URL as shown above, changing the last portion of the URL to the appropriate value for your group, and click the OK button to save your work.
If you click Advanced Options you will see the screen shown below.
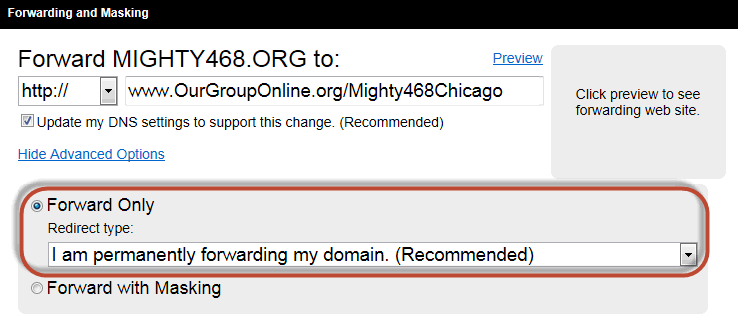
Do not change these options. Do not select "Forward with Masking". This can cause your site to not work properly on some browsers and devices.
After you click the OK button, it can take a few hours for this change to become effective.
Page Format
When you first visit your site, the top of the page will look like this.
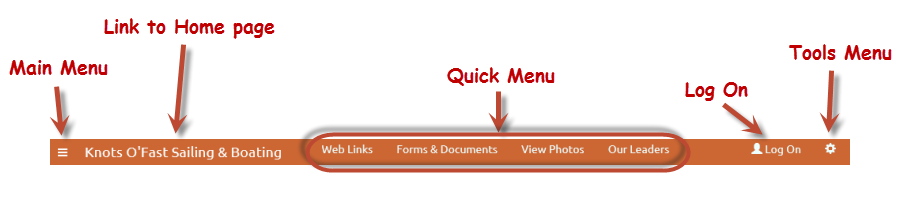
The main menu is accessed from the menu icon ![]() in the upper left corner of the page.
We'll show you what the menu looks like further dcown this page.
in the upper left corner of the page.
We'll show you what the menu looks like further dcown this page.
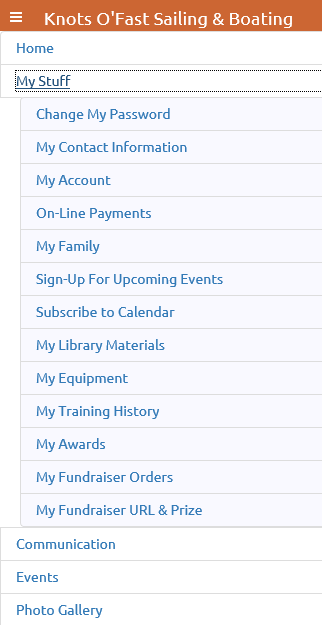
You'll see your unit's name just to the right of the menu icon. Click on the name to go to your home page.
Next to that you'll see your four most popular menu items in what we call the "Quick Menu". These menu items are selected automatically based on the number of times each public menu item has been accessed in the last month. Your site administrator can override these selections using the Configure Public Quick Menu page on the Security Configuration submenu of the Site Configuration menu.
The Log On link will bring up the new Log On window, which we'll show you on the next page.
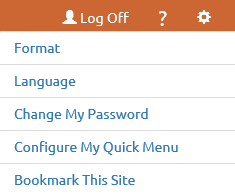
The cog icon in the upper right corner of the page will bring up the new Tools Menu, which will allow you to set the page format, choose an alternate language, and bookmark the site.
After you log on to the site, the options at the top of the page will look like this.
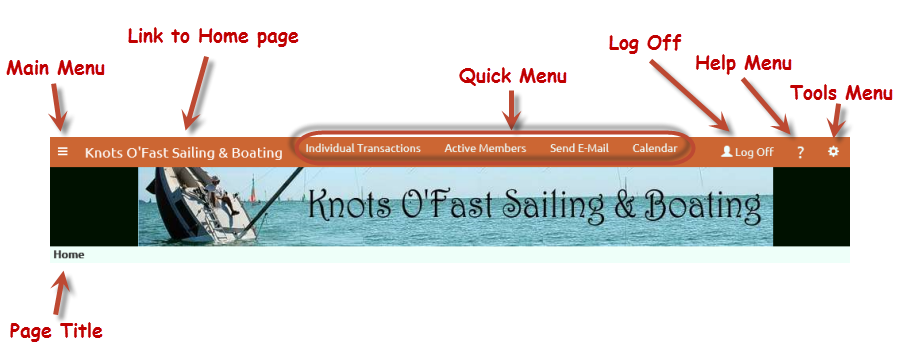
The Quick Menu is now personalized to you. It will contain the four menu items that you've spent the most time in over the past month. You can override these selections using the Configure My Quick Menu option on the Tools menu.
The Help icon will bring up a menu that takes you to the User Guide.
The Tools menu has additional choices, which let you change your password and configure your Quick Menu.
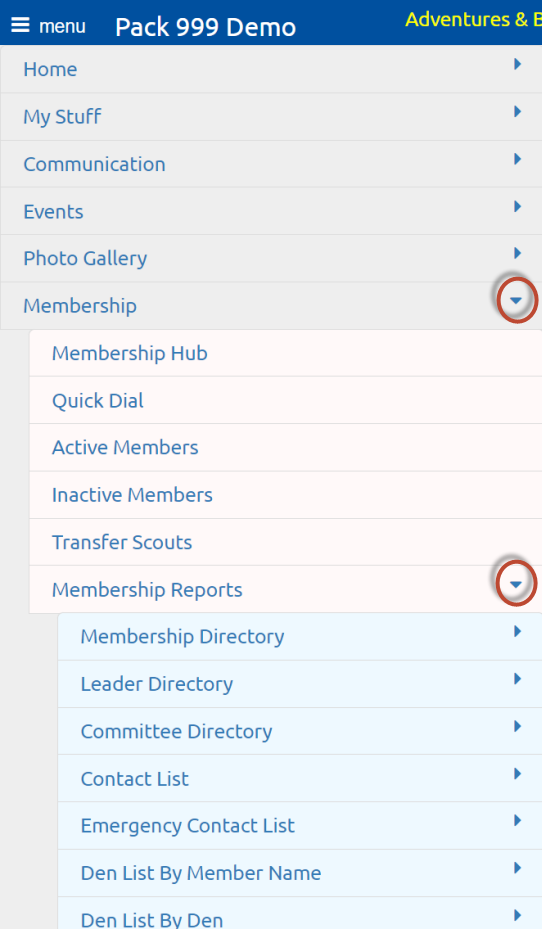
Click on the menu icon ![]() to view the main menu, as shown below.
to view the main menu, as shown below.
At first you will only see the top level items. Click on any of those items to see its submenu. Click on it again to make the submenu disappear.
Click on the cog icon ![]() in the upper right corner of the page to reveal the Tools menu.
in the upper right corner of the page to reveal the Tools menu.
Click on Format to display this pop-up window.
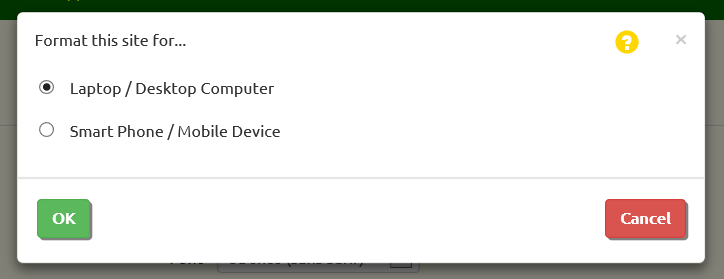
The system should automatically detect whether you are operating on a desktop PC or a mobile device based on the physical width of your screen. But if for some reason you need to change that setting, you can do it here. The Smart Phone / Mobile Device setting will cause all grids to be collapsed into a single column.
Click on Configure My Quick Menu to see the screen shown below.
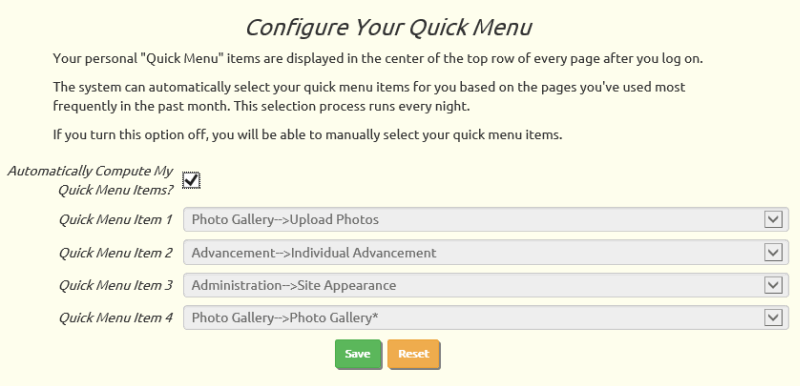
Your personal Quick Menu will be automatically reset every night based on the four menu items that you've accessed most frequently in the past month.
You can disable this process by unchecking the checkbox. You can then select the items to appear on your Quick Menu, which will remain in place until you change them.
Logging On To Your Website
 You'll find the
Log On link in the upper right corner of the page.
Click on this link to display the Log On window, as shown below.
You'll find the
Log On link in the upper right corner of the page.
Click on this link to display the Log On window, as shown below.
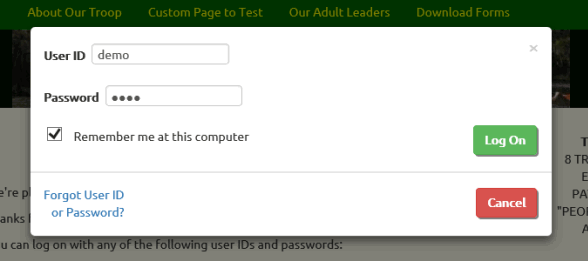
Type your User ID and Password into the boxes and then click the Log On button. You can use your TAB key to move from field to field.
If you click on the Remember me at this computer checkbox you won't have to logon again the next time you come to your site.
Do not check this box if you are on a public computer (like in a public library), or a computer that you share with people who should not be allowed to access your group's website.
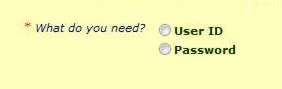 If you click on Forgot User ID or Password? the system will prompt you for your e-mail address and send you an e-mail with your login information.
If you've forgotten both your User ID and Password, begin by clicking on the User ID button.
NOTE: This function will only work if your e-mail address is on your membership record.
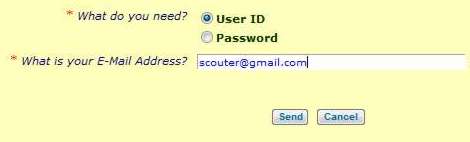
Type in the e-mail address that you registered with the group, then click the Send button.
You will receive an e-mail with the User IDs associated with that e-mail address.
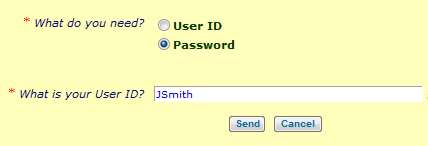
To retrieve your password, click on Password, enter your User ID and press Send.
You will receive an e-mail with the Password for this User ID.
Navigating Your Site
After you log on to your site, you'll still be on the Home page. How do you get to all of the other pages?
Earlier, we showed you how to access the Quick Menu at the top of every page. Your Quick Menu will change over time to take you to the four pages you use the most.

The most powerful menu is the Main Menu, which you open by clicking on the menu icon in the upper left corner of the page.
 The main menu contains all of the functions that your user ID is authorized for.
It can be up to three levels deep. Open up the next level by clicking the triangle icon to the right of that entry.
If you don't see a triangle on an entry, that means it represents a function you can access by clicking on the name.
Most pages contain buttons that can be used to move around the site. Some of these buttons will take you deeper into the site. In the example below, the Add a New Item button, Update button, and Delete buttons take you to a detail page to manage one row in the list.

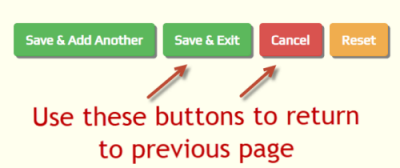
Other buttons can return you to a page you saw earlier. They will usually contain the word "Exit" or "Cancel".

You should NEVER use your browser's BACK and NEXT buttons to navigate your site!
OurGroupOnline keeps track of your progress through the site, leaving a trail of "bread crumbs" so it knows how to return when you click an Exit or Cancel button. And yes, it saves these "bread crumbs" in a "cookie"!
If you use your browser's BACK and NEXT buttons, this cookie will get out of synch. This may cause errors to occur.
While in OurGroupOnline, you should only use the menus, buttons and links within the page to move around.
Hubs give you an easy way to use the site. We'll talk about those next!
Hubs
As we just saw, the Main Menu gives you access to all of the functions you are authorized for. This can be a bit overwhelming, especially when you're just getting started. That's why we created hubs!
Hubs give you access to everything you need to manage a functional area of the site. We currently offer these hubs:
- Membership Hub lets you enter and view your membership roster, patrols, and crews. It also lets you manage training and leadership.
- Events Hub lets you manage your unit's calendar and access participation reports.
- Financial Hub gives you access to all money-related functions.
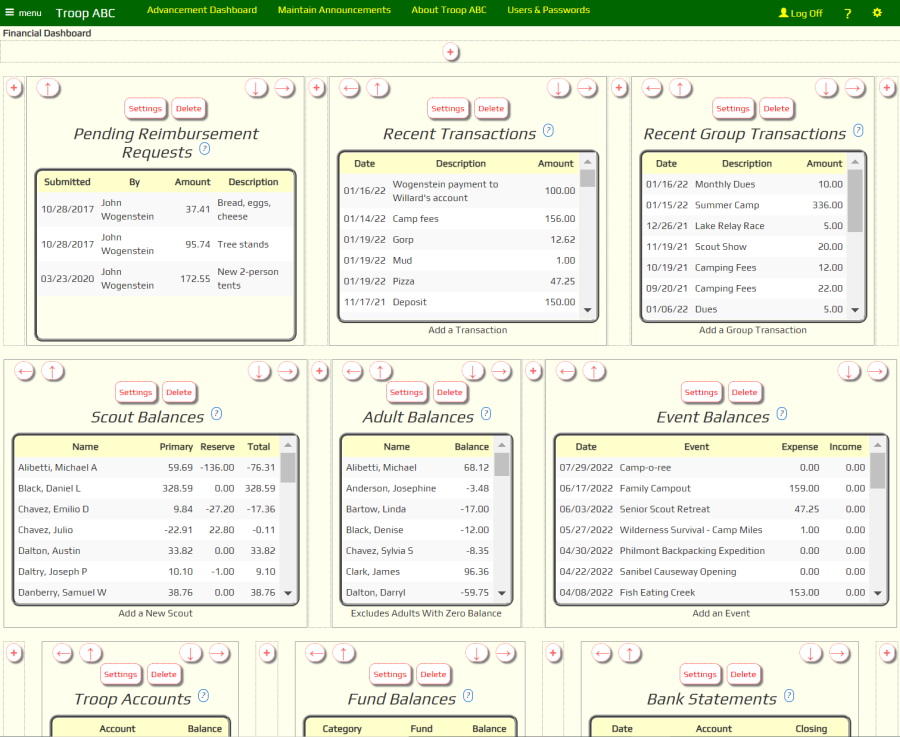
As an example, here is what your Financial Hub might look like:
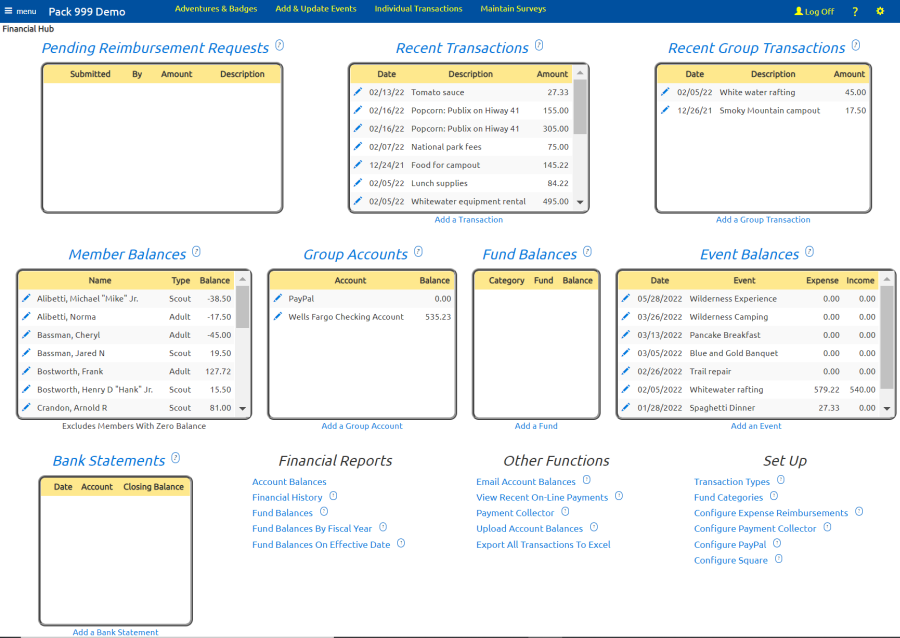
At the top of the page, you'll see a number of "Data Window" widgets that let you view the information in this part of the site from different perspectives.
The heading of each data window is a link to a corresponding page that shows you more information and lets you access more functions.
Many of the data windows have a link at the bottom that lets you add a row to that table.
Most data windows also have edit links - like this  - that let you enter information about that row.
Some data windows have a message link - like this  - that let you initiate an email to that person or group.
Further down the page, you will see several "Menu" widgets. These take you to the rest of the functions for this part of the site.
Once you're on a hub, you won't need to use the Main Menu to use this part of the system. Everything is right here on the page!
Editing Your Dashboard
Earlier we said that this is what the Financial Dashboard might look like. Why did we say "might"?
It turns out that you can customize any hub to fit the needs of your unit. The changes you make to a hub will be available to any member of your group who is authorized for that hub.
Only those users who are authorized for the User Role of Web Page Editor are allowed to edit hubs.
 To begin, open a hub page and click the
 icon in the upper right
corner of the page to reveal the Tools menu, as shown at right.
icon in the upper right
corner of the page to reveal the Tools menu, as shown at right.
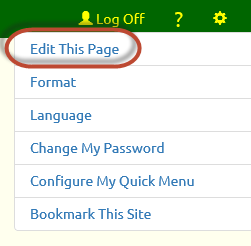
Click on "Edit This Page" at the top of the Tools menu.
Once you are done editing the page, go back to the Tools menu. The top item will now be "Exit Page Edit".
Page Sections
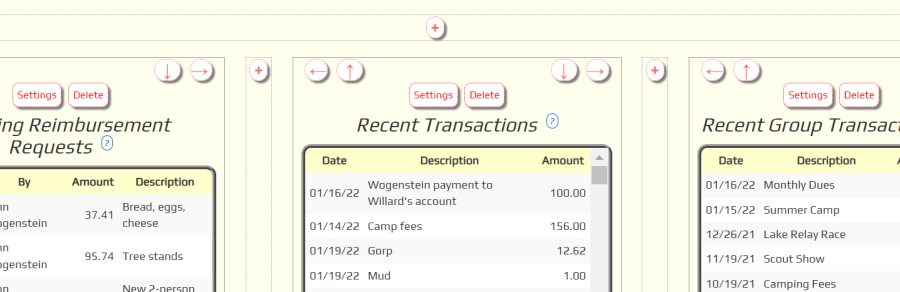
When you enter edit mode, you'll see the page divided into sections, as shown above.
A section is typically linked to a "widget", which is pre-programmed to pull information from your database or display a menu.
You can delete sections, move them around, or add new ones. You can even add sections with text and images that you provide, similar to what you can do when you edit your Home page.
Rearranging The Page
If you look more closely at the top of any section while you are in edit mode, you will see arrows in the upper corners. These arrows can be used to change the position of this section relative to the other sections on the page.
When editing a hub, it is best to only use the Left and Right arrows. Click the Left arrow to immediately swap positions with the section to its left. Click the Right arrow to immediately swap positions with the section to its right.
The Up and Down arrows will move that section into a higher or lower row. We don't recommend this, because it will prevent the page from arranging itself to fit the size of your monitor.
The hubs are designed to be "responsive", which means that on a wide monitor the sections will arrange themselves across the page before beginning a new row. On a narrow screen, like a cell phone, these same sections will stack vertically.
The best way to see this effect is to display the page full screen on a wide computer monitor, then resize the browser window to make it narrower. As the window gets narrower, you will see the sections rearrange to fit that width and, at the same time, make the page longer from top to bottom.
Adding A Section
For the same reason, when you add a section, you should usually add it to the left or right of an existing section by clicking the
![]() button you see to the left or right of that section.
In most cases you should not click the
button you see to the left or right of that section.
In most cases you should not click the ![]() button that is above
or below the current section, as that will cause it to create a new row.
button that is above
or below the current section, as that will cause it to create a new row.
When you click the ![]() icon, the system will display this pop-up window with the settings for your new section.
icon, the system will display this pop-up window with the settings for your new section.
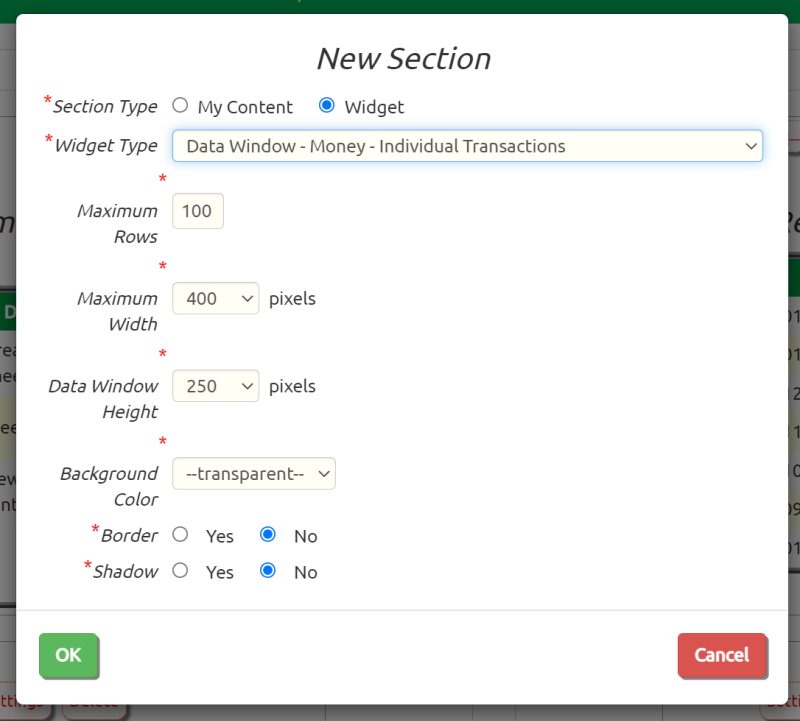
Choose between "My Content" which will allow you to enter text and images, or "Widget" which will fill the section with information from your database.
You can choose any widget from the list, even those that were designed for use with a different hub.
The choices you see on this page will change depending on the type of widget you select.
Data Window widgets and Menu widgets cannot be made available to the public. They are only available to users after they have logged on to the site, and then only if that user has sufficient access rights.
The Maximum Rows option limits the number of rows that will be displayed in this widget. The fewer rows, the faster it will load.
The Maximum Width will default to an appropriate value for the type of section you've selected. For "My Content" sections, this can be used to adjust the height of the section.
The Data Window Height determines how tall a scrollable Data Window grid will be.
The default Background Color is "transparent", but you can change this to any color you want. The drop down list gives you some standard choices, but if you select "Other" you'll have the opportunity to enter any RGB color you'd like. On most browsers you should see a color picker.
Border will draw a border around this section and Shadow will create a shadow effect behind this section.
Menu widgets have a slightly different set of options.

The standard Menu Style is "Regular", which will display a title at the top, followed by left-justified menu selections. The "Heading" option is designed to display at the top of the page, with no title and all entries centered in the section.
Click the OK button when you are done. This will immediately save your changes to the server.
Updating A Section
Click the Settings button to change the parameters for an existing section. You can even select a different widget!
Click the Delete button to remove this section from the page. A pop-up window will aks you to confirm this action.
Getting Organized
 Before you jump into building your new website, take some time to get organized.
In broad terms this means:
- Establish your goals
- Assign tasks to other leaders
- Pull together the needed information
At your next group meeting, discuss how you plan to use your website.
- What should your Home Page say about your group to the general public?
- Will you post photos and/or videos of group events on your website?
- What information do you want to collect about your members?
- Does your treasurer want to use the OurGroupOnline accounting system?
- Do you want to accept on-line payments from members using PayPal™
- How often do you want to send out the electronic newsletter?
Once you agree on your goals, it's time to assign responsibilities. Who is going to...
. . . Edit the Home Page and the About Us page?
. . . Enter upcoming events into the calendar?
. . . Upload photos and videos from recent events?
. . . Load the group roster and keep it up to date?
. . . Record training course completion?
. . . Maintain group accounts and enter monetary transactions?
. . . Enter the inventory of equipment and library materials?
. . . Set up users and assign permissions?
Now you're ready to prepare a checklist of tasks to bring your website up to speed.
Startup Checklist
This checklist will help you implement all of the features of OurGroupOnline.
Download This Checklist as Excel Spreadsheet
| Step # | Depends On Step # | Task | Assigned To | Target Date | Date Completed | |
| 1 | PLANNING | |||||
| Meet with leadership team to establish goals, responsibilities and schedule | ||||||
| Determine best sources of data for membership, advancement, participation, leadership, training & account balances | ||||||
| Decide whether the site will accept credit card payments and, if so, who will pay the credit card fees | ||||||
| Decide whether to allow adults to request expense reimbursements through the website | ||||||
| Fill out this checklist and send to all leaders | ||||||
| 2 | 1 | INITIAL ROSTER | ||||
| Set up Membership Types | ||||||
| A) If a data source exists, upload membership data for all members | ||||||
| B) Otherwise, enter membership data for leaders who will be helping set up the site | ||||||
| 3 | 2 | SECURITY | ||||
| Assign User Roles to leaders, giving them access to the functions they will need | ||||||
| Send user IDs and passwords to leaders who are helping set up the site | ||||||
| 4 | 3 | ROSTER | ||||
| If not possible to upload membership data, manually enter membership records for everyone | ||||||
| Scouting Units: set age level for all youth members | ||||||
| Set up Committees and their members | ||||||
| Set up Leadership Positions and assign to current leaders | ||||||
| Upload or enter leadership training | ||||||
| Create dynamic subgroups | ||||||
| Ask all leaders to enter their "About Me" section and upload a photo under My Contact Information | ||||||
| 5 | 3 | PUBLIC PAGES | ||||
| Review and update Site Appearance options | ||||||
| Create banner image (optional) | ||||||
| Edit the Home page and About Us pages | ||||||
| Create additional custom pages as needed | ||||||
| Create announcements | ||||||
| Upload forms and documents | ||||||
| Create links to other sites on the Web Links page | ||||||
| 6 | 3 | CALENDAR | ||||
| Review and revise Event Types | ||||||
| Enter event locations | ||||||
| Enter past events for which you plan to upload photos or enter monetary transactions | ||||||
| Enter upcoming events. Use the "copy event" functions to set up meetings or other recurring events. | ||||||
| Cub Scouts ONLY: Train leaders to use mobile app to take attendance at events. | ||||||
| 7 | 6 | PHOTO GALLERY / VIDEO GALLERY | ||||
| Upload photos from past events | ||||||
| Upload videos to YouTube and create links from Video Gallery | ||||||
| 8 | 4 | ADVANCEMENT (Cub Scouts ONLY) | ||||
| Upload advancement data from Scoutbook | ||||||
| Train leaders how to sign off on requirements on the website and the app | ||||||
| 9 | 3 | INVENTORY/LIBRARY | ||||
| Enter all library materials into inventory | ||||||
| Enter all shared equipment into inventory | ||||||
| Check out items to members who currently have them | ||||||
| Cub Scouts ONLY: Train leaders to use mobile app to check out and return library materials and troop equipment | ||||||
| 10 | 4 | ACCOUNTING | ||||
| Set up group checking account and enter starting balance | ||||||
| A) If data source is available, upload member balances | ||||||
| B) Otherwise, enter starting balances for each troop member | ||||||
| Set up credit card interface using Square or PayPal | ||||||
| Review and update expense reimbursement settings | ||||||
| Train leaders to use website to request expense reimbursements | ||||||
| Begin monthly statement reconciliation process | ||||||
| 11 | 4 | FUNDRAISERS | ||||
| Set up next fundraiser, including merchandise and sales prizes | ||||||
| Train members how to enter orders and sell on-line via ScoutSales.org | ||||||
| Train fundraising leaders how to use Booth Sales to run in-person fundraiser events | ||||||
| 12 | 4 | ROLL OUT | ||||
| Send user ID's and passwords to all members | ||||||
| Demonstrate/discuss new website at group meeting | ||||||
| Cub Scouts ONLY: Train scouts and parents to use mobile app to sign up for events and give permission | ||||||
| Set up automated electronic newsletter | ||||||
| Plan on-going site operation at leadership meeting | ||||||
Taking It To The Group
 The last section of your Startup Checklist
is entitled Roll Out. This is when you get the rest of your group involved with using your new website.
The last section of your Startup Checklist
is entitled Roll Out. This is when you get the rest of your group involved with using your new website.
Schedule time at a group meeting to make a presentation about the website.
If it is possible to have a video projection system and web connection, display your site and demonstrate how it works. If not, bring handouts that provide the basics on how to get started.
Be sure to point out:
- How to get to your new site.
- How to log on.
- How to change your password.
- How to update your contact information.
- How to view the calendar.
- How to sign up for events.
- How to view your account balance and transaction history.
Ongoing Operation
Now you need to be sure you have a plan for keeping all of the information on your site up to date.
Meet with other leaders and group members to review roles and responsibilities.
Consider dividing tasks between members with specific roles. You might, for instance, have one user assigned to update the calendar, while another is responsible for uploading photos.
Make sure that everyone knows how to perform their tasks and how to consult the user guide. It is particularly important that your treasurer understands how to use the online accounting system.
Above all, be sure to spread the load. Managing your group can be easy if everyone does their part!
Internet Explorer 11
When Microsoft released Internet Explorer 11, we recommended that users add OurGroupOnline to their Compatibility View list.
This is no longer necessary now that we've upgraded our software to be fully HTML 5 compatible.
For best results, we now recommend that you remove your site from the Compatibility View list if you are using Internet Explorer 11.
To do this, first open up Internet Explorer and find the tool bar in the upper right corner of the page. It looks like this:
![]()
Click on the gear image (circled above) to view the Tools menu:
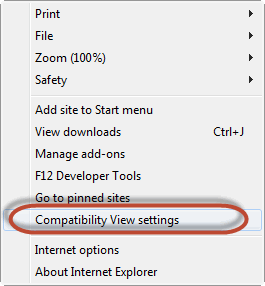
From this menu, click on Compatibility View settings. This will display this dialogue box:
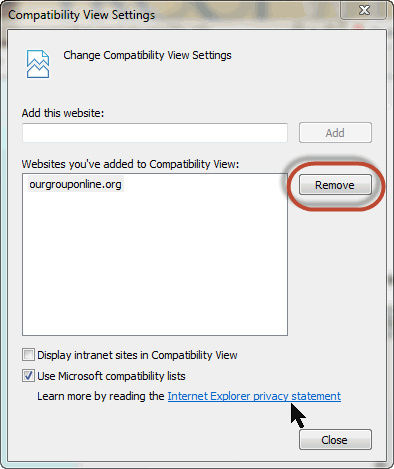
Click on the row that says OurGroupOnline.org so that it is highlighted as shown above, then click the Remove button to remove it from the list.
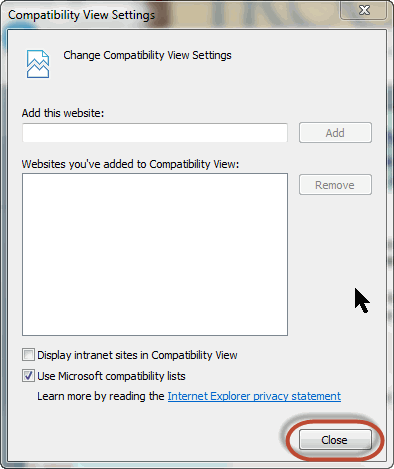
Press the Close button to complete this process.
Getting Started - Frequently Asked Questions
 Our group has our own URL. Why doesn't that show up in my browser's address line?
Let's suppose your group owns the URL www.fmbYachtClub.org. You can tell the world - and especially the members of your group - to use this URL to get to your site. This will help everyone because it is so easy to remember.
However, once you arrive at your site, if you look at your browser's address line, you will see something like this:
![]()
We redirected your browser to this location because that is where the OurGroupOnline software is installed. Otherwise, we would have to install a separate copy of the software for each group, which would cause it to run more slowly and would make it difficult for us to roll out new versions.
This is also where our SSL certificate is installed, which provides your group with safe, secure communications whenever you access your site.
I'm really in a hurry to get started. I could do this much faster by myself. Why do I have to involve the other leaders?
By involving the other leaders in setting up the site you spread the work, but more importantly you gain their commitment to using the site on an on-going basis.
Don't assume that "if you build it, they will come." Getting the other members of your group to use the site may be one of the biggest hurdles you have to overcome.