Security: User IDs and User Roles
 When you log on to your site, you accomplish several things:
- The system verifies that you are authorized to access confidential information about your group.
- You identify yourself to the site, so it can display information specific to you.
- The menu is customized to contain only those functions for which you are authorized.
Every member of your group should be assigned a unique User ID and Password when you create their record in the Active Members table.
Each User ID is linked to that member's account. This allows the system to display information specific to that person in the My Stuff menu.
Each User ID is also linked to specific User Roles. These roles determine what functions this user will see on his or her menu.
If you are your group's Site Administrator, you are responsible for assigning Roles to each member. You can do this from the User IDs and Passwords page.
Be generous! The more members that can do a particular function, the more likely it is to get done.
User Roles
 You determine how much each user can do on your site by assigning them to one or more roles.
OurGroupOnline provides a set of default roles to fit the basic needs of most groups. Although you can customize and add new roles via the Security Configuration menu, we strongly encourage users of our service to use the preconfigured roles.
Each member of your group will automatically be assigned the Member role. This allows them to view all of the information they will need to participate in group activities. Members can also edit their own personal information.
The Leader role can view and maintain nearly all of the records on the site. They cannot edit webpages, edit the site configuration, or see and edit security details.
The Site Administrator has access to every function of the site. Most importantly, they can designate user roles and maintain the site configuration. Make sure you designate at least two site administrators so you have a backup!
The Treasurer can create financial accounts, enter monetary transactions, generate financial reports and reconcile bank statements.
The Financial Review role allows a user to view all of the accounting information but not enter or update that information.
The Event Planner can add, update, and remove events from the calendar. They can also upload photos and videos related to events.
The Membership role, not to be confused with the Member role, allows a user to enter new members and update existing member records.
The Librarian can check in and check out library materials, and maintain the library inventory.
The Group Equipment role allows the user to check in and check out group equipment, and maintain the group equipment inventory.
The Forum Moderator role allows a user to update and delete other users' posts made on the Forum.
The Web Page Editor can edit the Home page and the About Us page.
The Guest role has the ability to view the calendar, but not sign up for events. Note that Guest users must still have a membership record; you may want to set up a dummy membership record for the Guest user acount with no more information than a name of "Guest, Guest". If you give the Guest user a user ID of "guest" it will not be subject to the normal restriction that prevents more than one user from being logged on with the same user ID at the same time.
Be generous with security! Make sure that at least two members are assigned to each important role.
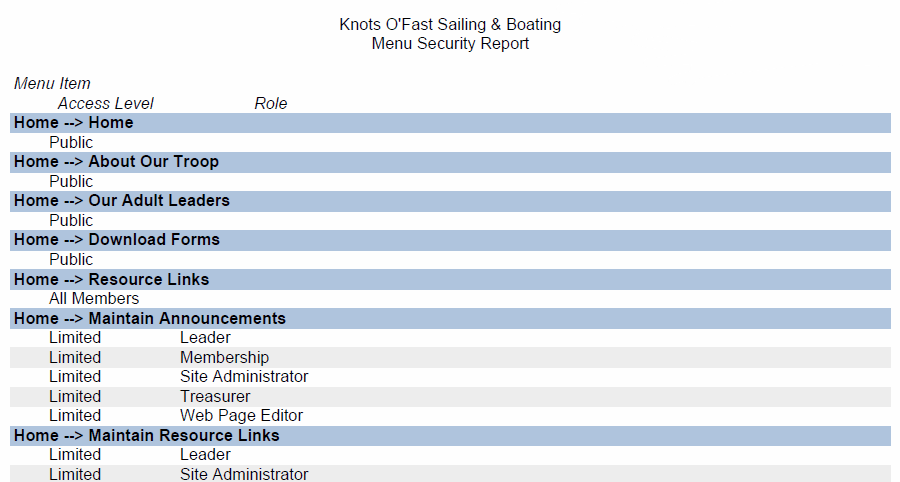
You can view the menu items available to each User Role by going to Administration → Menu Security Report. You will see a report like the one shown below. For each menu item, it shows the user roles that are authorized for that menu item.
If the Access Level is Public, it means that any visitor to your site can view this page without logging on.
If the Access Level is All Members, it means that every user can view this page once they log on.
If the Access Level is Limited, it means that only those users who have been assigned one or more of the listed User Roles can view this page.
Adding and Updating User IDs and Passwords
User IDs and passwords are automatically generated when you create a new member record. To do this, go to the Active Members page on the Membership menu and click the Add a New Record button. This will take you through a series of pages that allow you to enter all the relevant information about that member.
There will be times when you will need to add or update User records, particularly when you want to authorize additional functions.
To manually create User IDs and passwords or modify existing ones, you can go to the Administration menu and select the Users & Passwords page. This will display a page like the one shown below:
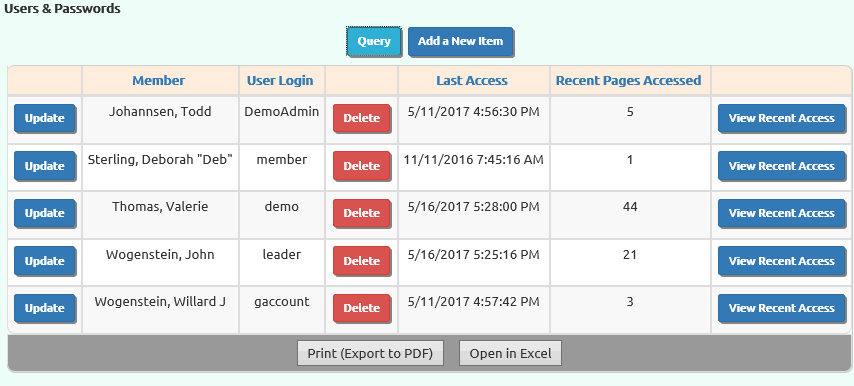
This displays all of the User IDs currently set up for your group. For each User ID it shows the last time they accessed the site, and the number of pages they've accessed in the last 28 days. Click View Recent Access to see the pages viewed by this user over the last 28 days.
You may Update a user you see on the list, or press Add a New Item to add a new user, either of which will bring you to the page shown below.
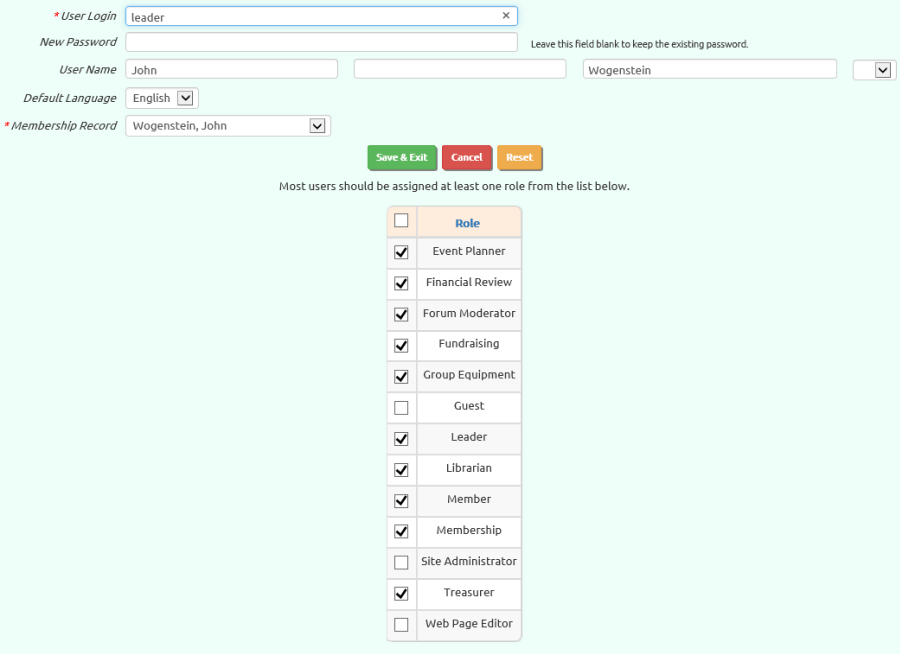
The User Login must be unique within your group. Two users may not have the same User ID.
The Password must be at least 8 characters long and contain at least one uppercase letter, one lowercase letter, and at least one numeric character or a special character.
The Membership Record is the member of the group to whom this User ID belongs. Before you add a User ID you must first add this person as an active member of your group.
Click on the checkbox next to each User Role you wish to assign to this member.
Be generous when assigning roles to users. The more members who can do a particular function, the more likely it is to get done.
Send Members Their User IDs and Passwords
Once you are ready for other members of your group to access the website, use this function to let them know how to log on.
Go to the Administration menu and select Send User IDs and Passwords. You should see the screen shown below.
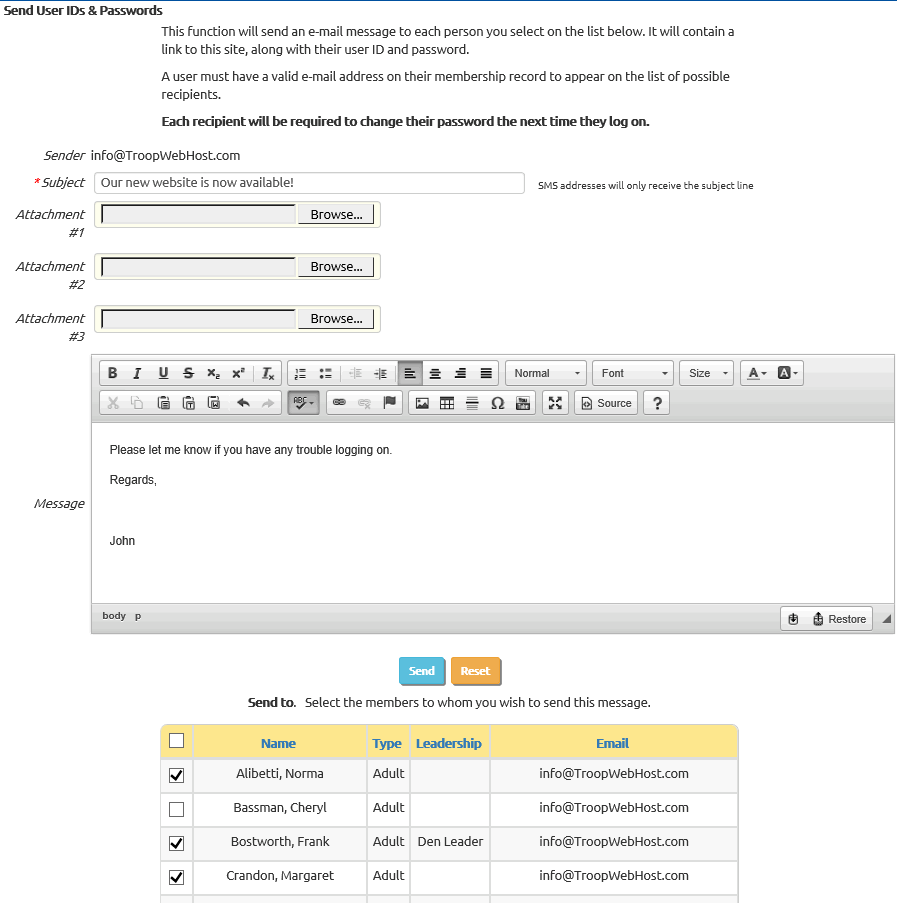
The Subject will be the subject line of your e-mail.
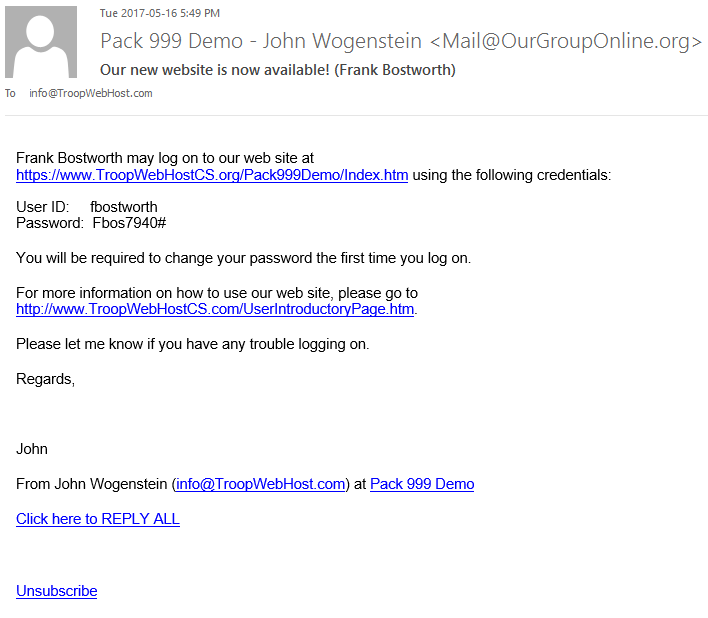
Whatever you write in the Message box will be added to a system generated message that includes the User ID or Password, along with a link to a page that shows how to use the site. An example is shown below.
Click on the checkbox of each user to whom you wish to send this message. If you want to send it to the entire group, click on the check box at the top of the grid.
Please note that everyone you send this message to will be required to change their password the next time they log on.
Press the Send button at the bottom of the page to send the message.
This is what the message will look like:
Automatically Send User ID and Password To New Users
The system can automatically generate an email to new users that will contain their user ID and temporary password, along with a link to this site.
This feature is turned off for new sites to prevent messages from going out before you are ready for the members to start using the site. Once you've loaded your roster and are ready for everyone to log on, you should use the Send User IDs and Passwords function to send an initial message to everyone with their site credentials.
But after the initial set-up is done, you can go to Administration → Automatically Send New User IDs to automate this process, as shown below. After you enable this feature, any members who are added after that point will receive the automated message with their user ID and password.
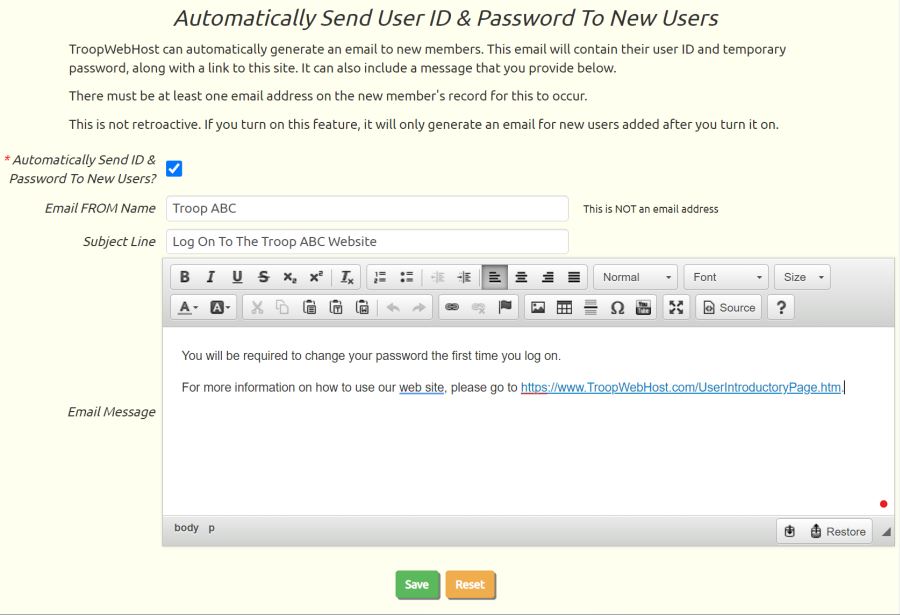
To enable this feature, put a checkmark in the box Automatically Send ID & Password To New Users?
The Email FROM Name is the name - not the email address - that will be displayed as the FROM name on the email that gets generated. You can change that to whatever you would like.
Similarly, you can change the Subject Line or Email Message to fit your unit's requirements.
Be sure to click Save to save your changes!
Deleting a User
When a member leaves the group you should delete their User ID to prevent them from continuing to access the group web site.
To delete a user go to the Administration menu and select Users & Passwords.
Find the user you wish to delete in the summary grid, as shown at right, and press the Delete button to begin deleting that user.
This will not delete their membership record. To prevent the person from being listed on your Active Members page, you should set their Membership End Date.
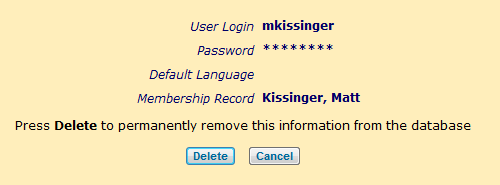
The system will display the page shown at left to confirm that this is the record you wish to delete.
Press the Delete button on this page to permanently delete this User ID.
View User Permissions
You can view the roles assigned to an individual user from the User IDs and Passwords page, but sometimes it is helpful to see all of the users and the roles they've been assigned in one place.
There are two ways to access this information:
- Display User Permissions
- User Permissions Report
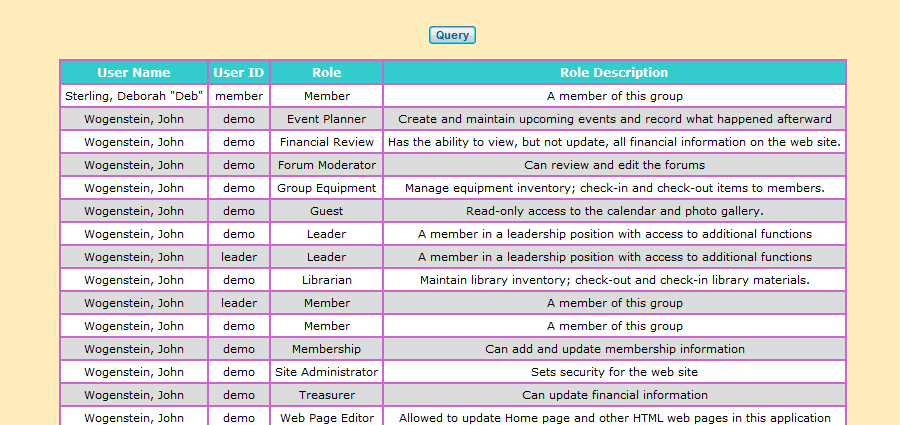
Go to Administration → Display User Permissions to view all users and their assigned roles, as shown below.
Notice that you can sort this list by clicking on the column headings.
You can also print this list or open it in Excel using the buttons at the bottom of the grid.
The User Permissions Report contains this same information, as shown below.
To produce this report, go to Administration → User Permissions Report.

Security - Frequently Asked Questions
 I tried to log on several times. I finally remembered my password and it still won't let me log on. Why not?
The site will temporarily lock out your IP address after a certain number of unsuccessful logins. This prevents hackers from writing a program to find a valid User ID and Password by trying lots of combinations.
Please wait a couple of hours and try again.
A number of us were trying to use the site during our weekly meeting, but now no one can log on. What happened?
If you were all using the wi-fi network at your meeting place, you were all sharing the same external IP address.
So if some of your members had trouble entering their passwords correctly, this could cause everyone on that wi-fi network to be locked out, as described above. Fortunately, those members who succeeded in logging on will still continue to be able to use the site.
We recommend that you caution your members not to attempt a second log on if their first attempt fails. Instead, they should wait until everyone else has logged on successfully before trying again.
Will the site automatically log me off if I'm not active for a period of time?
No. For your convenience, you will stay logged on until you close your browser or log off.
If you check the "Remember me at this computer" box when you log on, it will keep you logged on even after you restart your computer.
For this reason, you should always log off when accessing your web site from a shared or public computer.
Is our site encrypted? Why don't I see "https://" at the beginning of my URL?
Yes, your site is encrypted. The software is running inside a frame. The inner frame is always encrypted.
However, if you want to be absolutely sure, change the "http://" in your URL to "https://". The "s" in "https//" indicates that the site is using SSL encryption.
Will the site automatically log me off if I'm not active for a period of time?
No. For your convenience, you will stay logged on until you close your browser or log off.
If you check the "Remember me at this computer" box when you log on, it will keep you logged on even after you restart your computer.
For this reason, you should always log off when accessing your web site from a shared or public computer.
Can I create a guest account that has very limited access?
Yes. You can create a User ID that is only given the role of "Guest". This User ID should not be linked to a Membership record.
A guest user will be able to view the calendar and photo gallery. They will not be able to send e-mail or sign up for events.