Events
 Your Calendar is available to every member of the group once they log on to your site.
The first step in setting up your calendar is to add the Event Locations that your group commonly uses.
You can then Add Events to your calendar.
Events that occur on a regular basis, like weekly meetings, can be produced automatically using the Copy An Event feature.
Once the event has been created, you can send an iCalendar E-Mail Invitation to each member of your group. If they accept the invitation it will be added to their personal calendar.
Members of your group can sign up for events from the My Stuff menu.
If you create shifts for an event, your members can sign up for shifts.
You can record the final roster of who attended an event when you Take Attendance.
You can also Take Attendance For Shifts.
Events Hub
The Events Hub gives you a central page to manage your group's calendar. It is available to any user who has a role that is authorized for the "Maintain Events", or "Events Hub" tasks. You'll find it at Events → Events Hub.
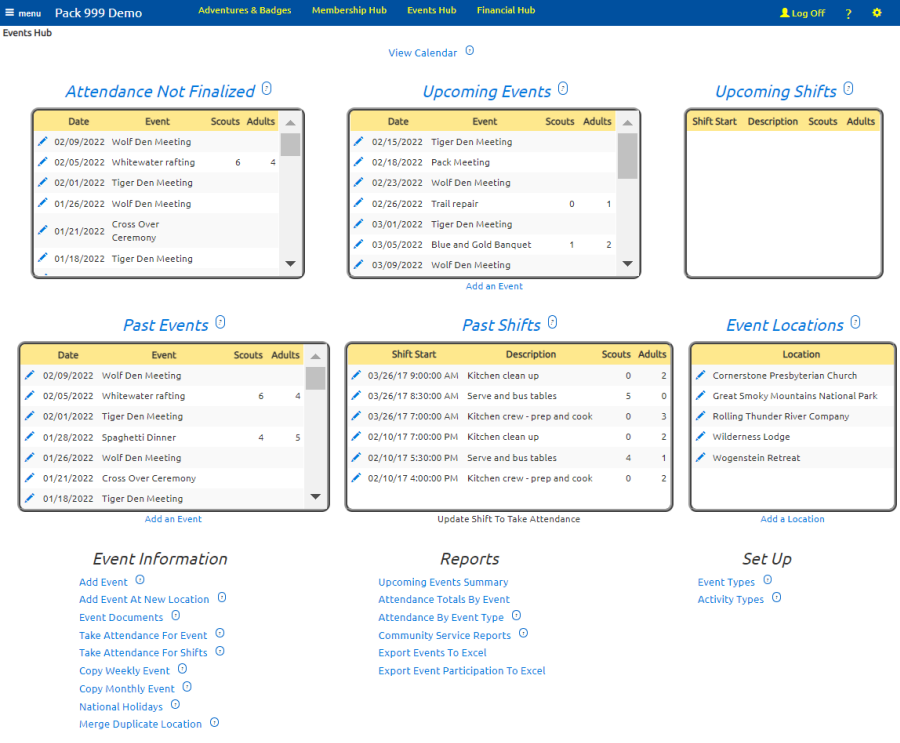
Like all hubs, you can edit the Events Hub to fit your group's requirements. This allows you to remove widgets you don't need - like the "Upcoming Shifts" data window if you don't use shifts. You may also add or replace widgets.
You can choose from the following Data Window widgets:
| Widget Name | Displays | Links To |
|---|---|---|
| Data Window - Events - Upcoming Events | Future events. | The heading links to the Upcoming Events tab of the Add and Update Events page. |
| Data Window - Events - Upcoming Shifts | Future shifts. | The heading links to the Upcoming Events tab of the Add and Update Events page. |
| Data Window - Events - Past Events | Past events. | The heading links to the Past Events tab of the Add and Update Events page. |
| Data Window - Events - Past Shifts | Past shifts. | The heading links to the Take Attendance For Shifts page. |
| Data Window - Events - Attendance Not Finalized | Past events for which you have not yet finalized attendance. | The heading links to the Take Attendance page. |
| Data Window - Events - Event Locations | Event locations. | The heading links to the Maintain Event Locations page. |
Unless otherwise specified above, the  icon will allow you to update that row,
and the
icon will allow you to update that row,
and the  icon
will allow you to send a message to that person or group.
icon
will allow you to send a message to that person or group.
The Events Hub may also include these Menu widgets:
| Widget Name | Contains |
|---|---|
| Menu - Events - View Calendar | A link to view the calendar. This menu is intended to be placed at the top of the hub, using the "Heading" menu style. |
| Menu - Events - Event Functions | Functions that let you maintain your calendar. |
| Menu - Events - Reports | Reports showing event participation. |
| Menu - Events - Set Up | Site configuration and supporting tables. |
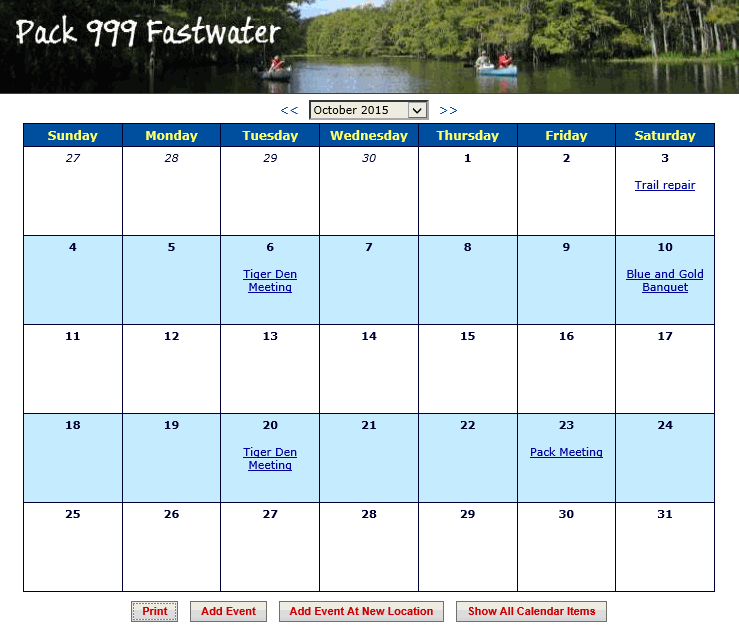
Calendar
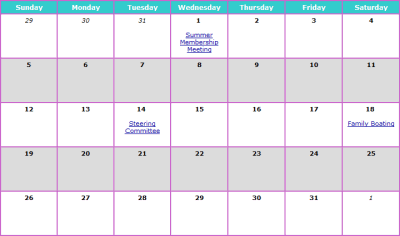
All members of your group can view the Calendar once they log on to the site.
Select Calendar from the Events menu to view the current month's schedule, as shown below.
Use the drop down box at the top of the page to select a different month, or use the <<< and >> links to go backward and forward through the calendar.
Click the Print button to produce a PDF document showing this month's calendar.
If you are authorized to add events to the calendar, you will see the Add Event and Add Event At New Location buttons, which will allow you to add an event to the calendar.
Show All Calendar Items will show the calendar with all events, including those that are restricted to a dynamic subgroup to which you do not belong.
Click on any event to see the details of that event, as shown below.
Click on Send Me An Invitation to send yourself an e-mail invitation to this event. When you receive this e-mail you can add it to your personal calendar by accepting the invitation.
Sign up for this event by clicking on the Yes button next to the name of each family member who plans to attend; if you are not planning to attend, click the No button. Be sure to click Save or Save & Exit to save your choices.

Scroll to the bottom of this page to reveal several additional buttons:
- Add Group Transaction For Participants
- Print Participant List
- E-Mail Participants
- Invite Undecideds
- Update This Event
- Exit
Only those users authorized to create monetary transactions will see the Add Group Transaction For Participants button. This will initiate a group transaction with this event selected as the "Credit Event", and all of the participants on this event pre-selected. This makes it easy to charge everyone who attended.
Click on Print Participant List to produce a PDF document showing all members who have signed up for this event.
The E-Mail Participants button will let you compose an e-mail with all of the participants pre-selected.
Invite Undecideds will take you to a page that lets you broadcast an iCalendar E-Mail Invitation to this event. The members of the group who have not yet indicated whether they attend will be pre-selected, but you can change the invitation list to include the entire group.
If you are authorized to maintain events, you will see an Update This Event button that lets you change the information about this event.
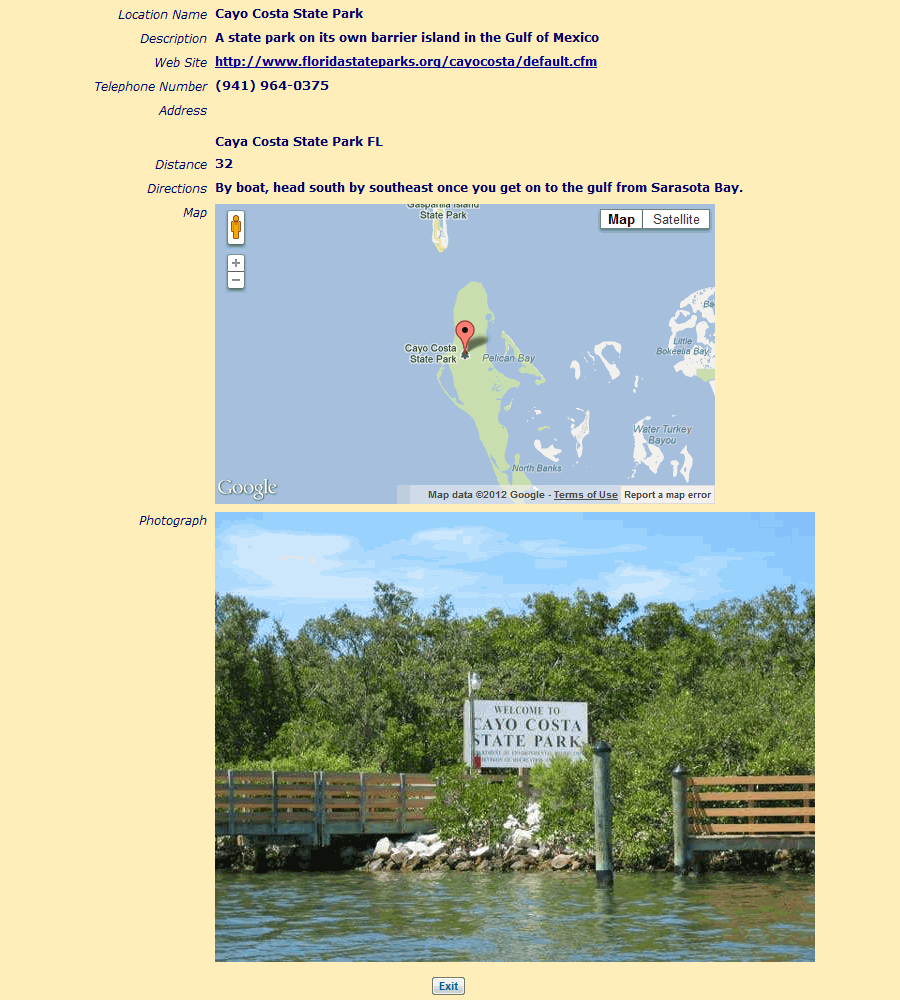
Click on the location name to view the details of that location, as shown below.
E-Mail Invitation
You can send an e-mail invitation to selected members of your group by clicking the Invite Undecideds button from the Calendar detail page or at the bottom of the Sign-Up List tab on the Add And Update Events detail page.
Either way, you will end up in a page that looks like the one shown below.
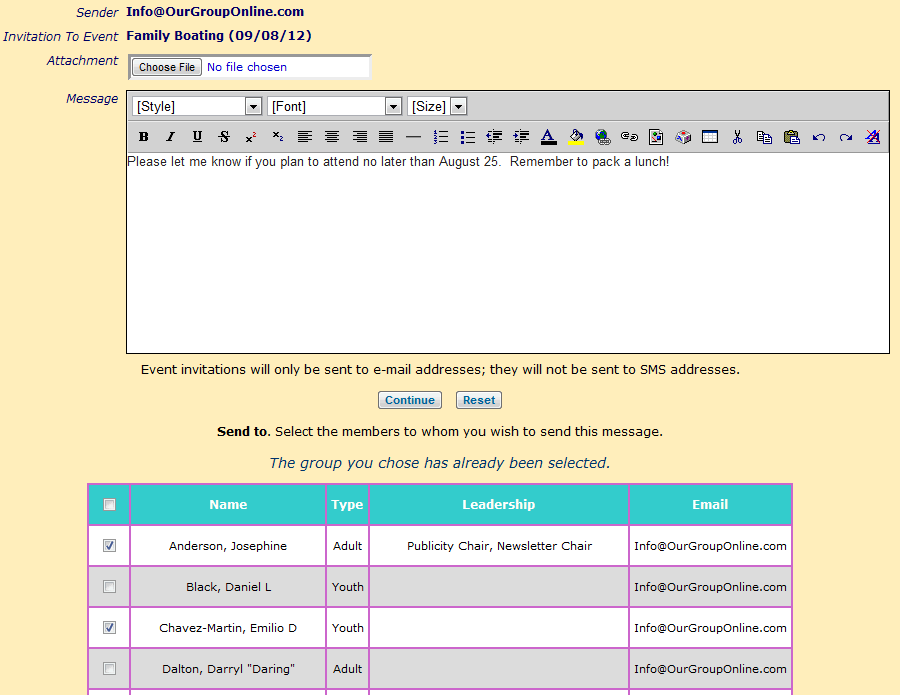
This looks like the standard Compose E-Mail page, but with a special twist: each message will contain an embedded iCalendar meeting invitation which will allow the recipient to Accept or Decline the invitation.
This message will only go to E-Mail addresses; it will not go to SMS addresses, since SMS recipients do not recognize an iCalendar invitation.
The members of the group who have not yet indicated whether they plan to attend will be pre-selected, but you can add or remove recipients from the list by clicking on the checkbox next to their names.
You can select all members of the group by clicking on the checkbox at the top of the grid.
When a member receives this message, their e-mail client will give them the option to Accept or Decline the invitation as shown below.
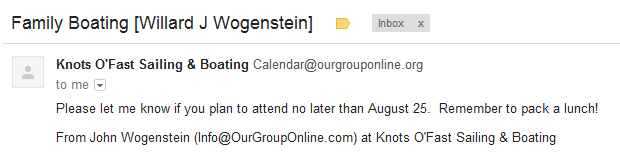
If they Accept the invitation it will be added to their personal calendar.
Regardless of whether they Accept or Decline, their e-mail client may then ask them if they want to send a response. The response will update the group's database to show whether this member plans to attend.
Note that the system will generate an invitation to each selected member, even if that person shares an e-mail address with another family member. This is because the invitation is personalized to each member, and their response must be for an individual person.
The Subject line of the invitation indicates for whom the invitation was sent; when you Accept or Decline the invitation, you will update the status for that person.
Event Reminders
 The system can automatically send out messages to members of your group reminding them of an upcoming event.
You set up these reminders using Event Types.
Once an event type has been configured to send out reminders, a reminder will be sent out for every event of this type.
Select Event Types from the Site Configuration menu. Update an event type and scroll down to the bottom of the page to see the Send Reminder Prior To Event checkbox. Click on that checkbox to see the rest of the parameters for event reminders, as shown below.
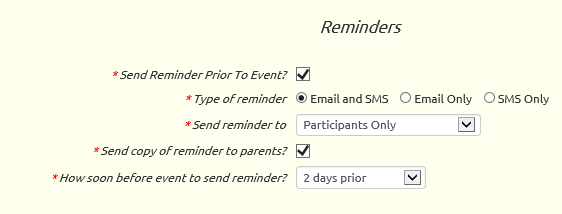
Reminders can be set up to go to both email and SMS addresses, or one or the other.
You can send the reminder to:
- Everyone
- Participants Only (those who have signed up for the event)
- Undecideds Only (those who haven't signed up or declined the event)
- Participants and Undecideds
You can send a copy of the reminder to the parents of the selected recipients. With this option selected, a reminder going to Participants Only will also go to their parents, even for participants who do not have an e-mail address.
Reminders can be set to go out on the day of the event, one to six days prior to the event, or one to four weeks prior to the event.
The system will begin generating reminders every day at 8:00 AM local time, beginning with the same day reminders for every group.
SMS reminders will only contain the subject line of the reminder like this:
REMINDER: Annual Banquet on Friday March 27 at 6:00 PM
This is what an e-mail reminder looks like.
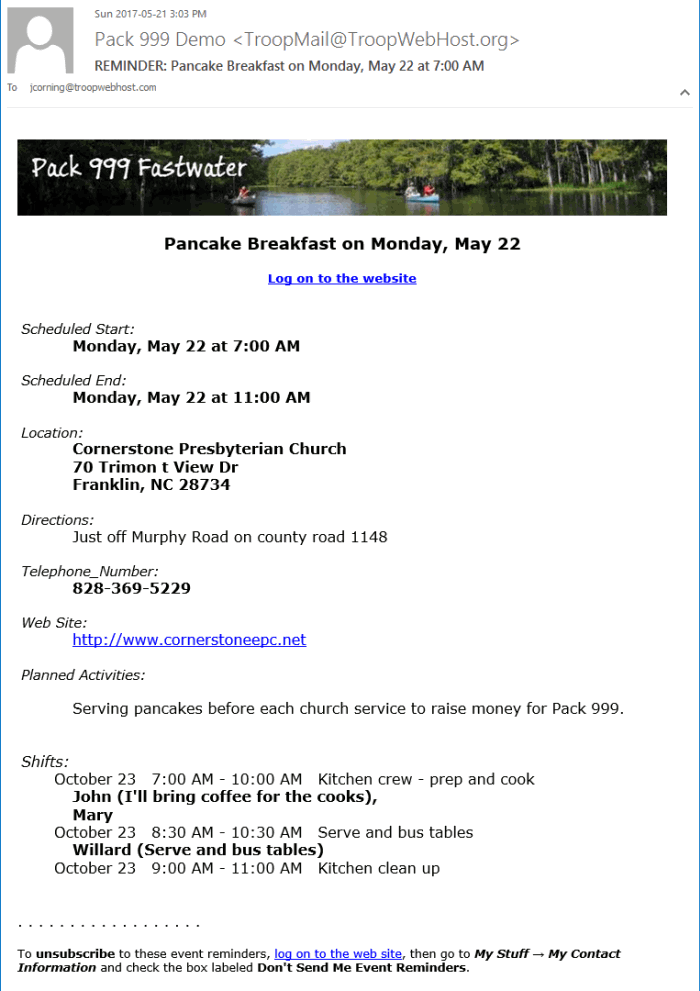
Click on the link below the event name to log on to your site. If you are already logged on this link will take you directly to the calendar detail page for this event.
The schedule and location appear at the top.
If this type of event allows members to sign up, then the current sign up status for each member of the recipient's family will be displayed.
If this event has shifts, then a list of shifts will be displayed. If family members have signed up for a shift their names will appear next to that shift.
Finally, if this event has a meal plan or list of scheduled activities, those will appear at the bottom of the reminder.
Opting Out
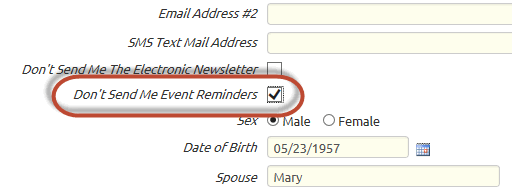
Any member of your group who does not want to receive event reminders may opt out by going to My Stuff → My Contact Information and checking the Don't Send Me Event Reminders checkbox, as shown above.
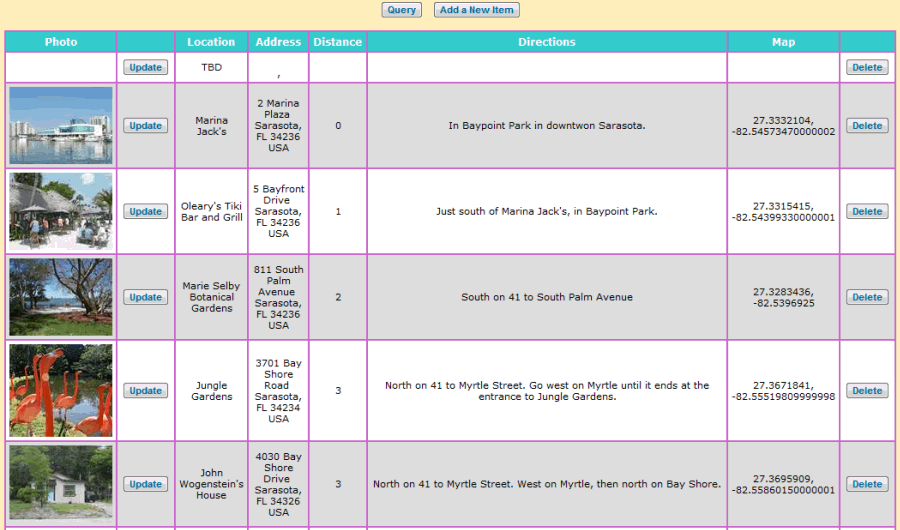
Event Locations
Many groups have a number of locations that they return to time and time again. Their meeting place, favorite activity spots, local atractions.
Once you create an Event Location record you can reference it every time you schedule an event for that location.
Select Event Locations from the Events menu to get started.
Click Add a New Item to add a new location to this list. That will bring up a page that looks like the one below.
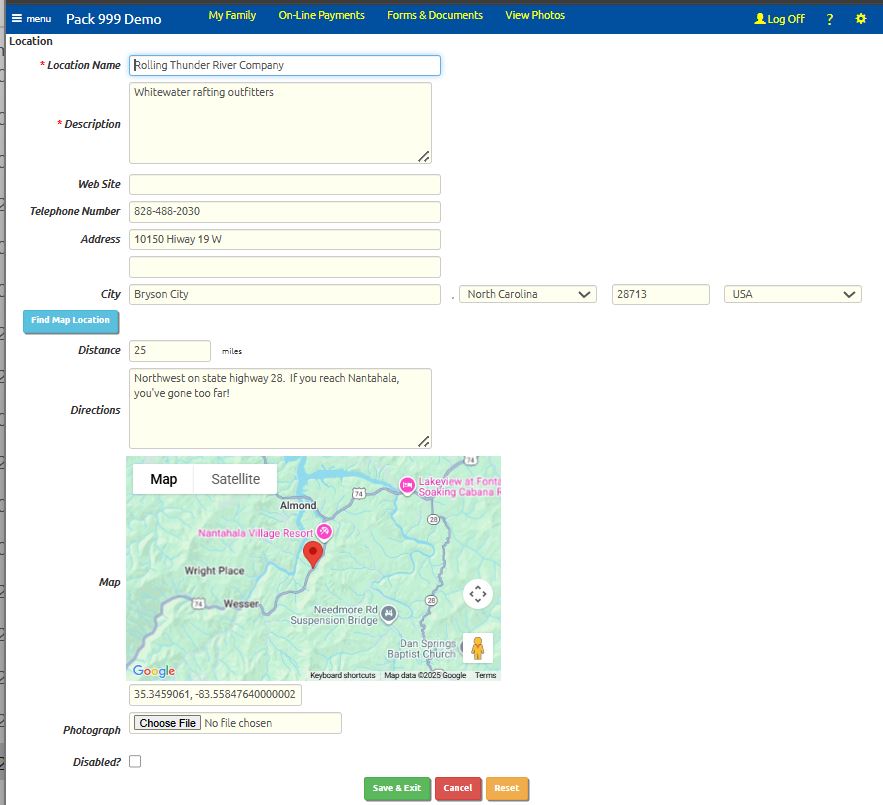
The Location Name and Description are required, as indicated by the red asterisks.
After you fill in the Address fields, click Find Map Location to look up the geographical coordinates for this location. If the address is valid, you should see a map appear below the directions box.
If you do not have an exact address for the location, you can enter the latitude and longitude directly into the Map field. Note that longitudes in the western hemisphere are expressed as negative numbers.
The Distance is the distance from your regular meeting place. This will be a big help to your treasurer if you compensate drivers for mileage.
Most location lists are sorted by distance from your meeting place, with the closest locations appearing at the top of the list.
Be sure to enter your regular meeting place as a location.
To upload a photograph of this location, click the Browse button to locate that image on your local disk. It will be uploaded when you save this record.
To replace a photograph of this location, click the Remove Image button, then click Save & Exit. This will delete the old image. Then update the location again and use the Browse button to select the new image. Then click Save & Exit to save the new image.
Check the Disabled? box to prevent this location from showing up on drop down lists for events. This will not cause a problem for past events that referenced this location.
Click Save & Exit to save your work.
Merge Duplicate Locations
Sometimes you accidentally create a new location record for a place that already has one. Once you reference that new record from an event, you won't be able to delete it.
Instead, you can merge the two location records to get rid of the duplicate.
To do this, select Merge Duplicate Locations from the Calendar menu.
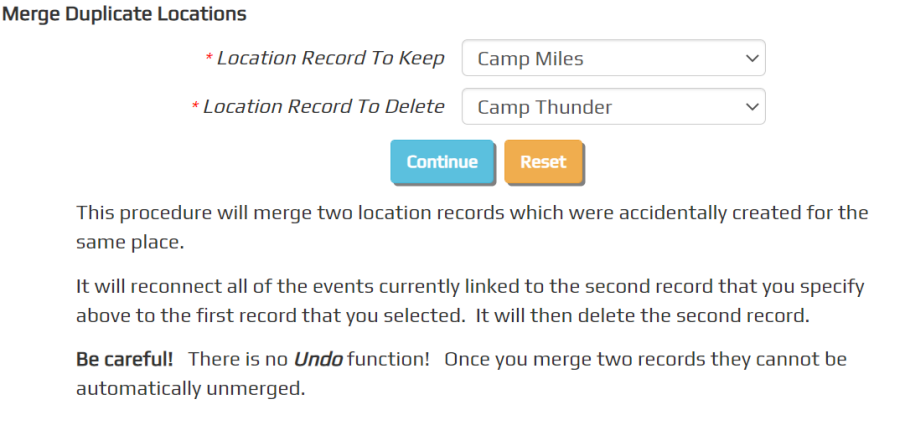
Select the location you wish to keep in the first drop down list.
Select the location you wish to merge (and delete) in the second drop down list.
Click Continue to complete the merge.
Add and Update Events
Select Add and Update Events from the Events menu to begin adding events to your calendar.
The two tabs on this page allow you to view upcoming events, going forward in time, or past events, going back in time.
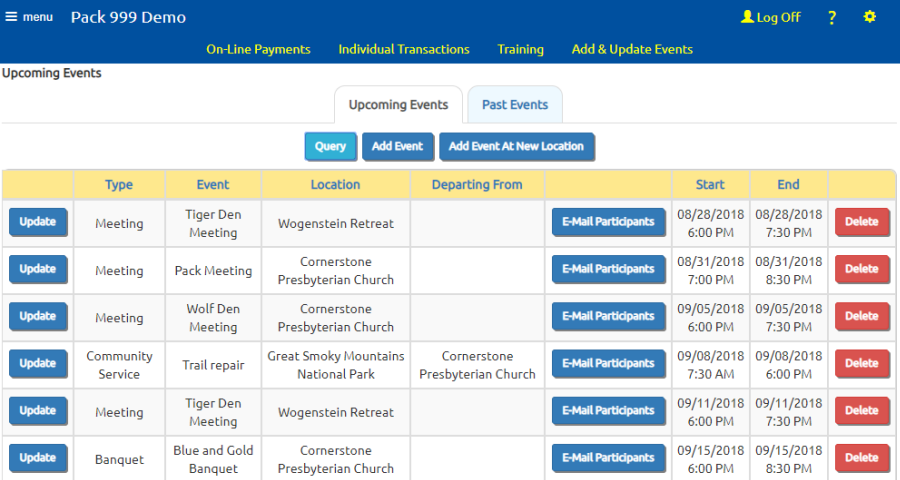
Click Add Event to add a new event for which you already have an Event Location on file.
Click Add Event At New Location to create a new event location and a new event, in that order.
Either way you'll eventually end up at a screen that looks like the one below.
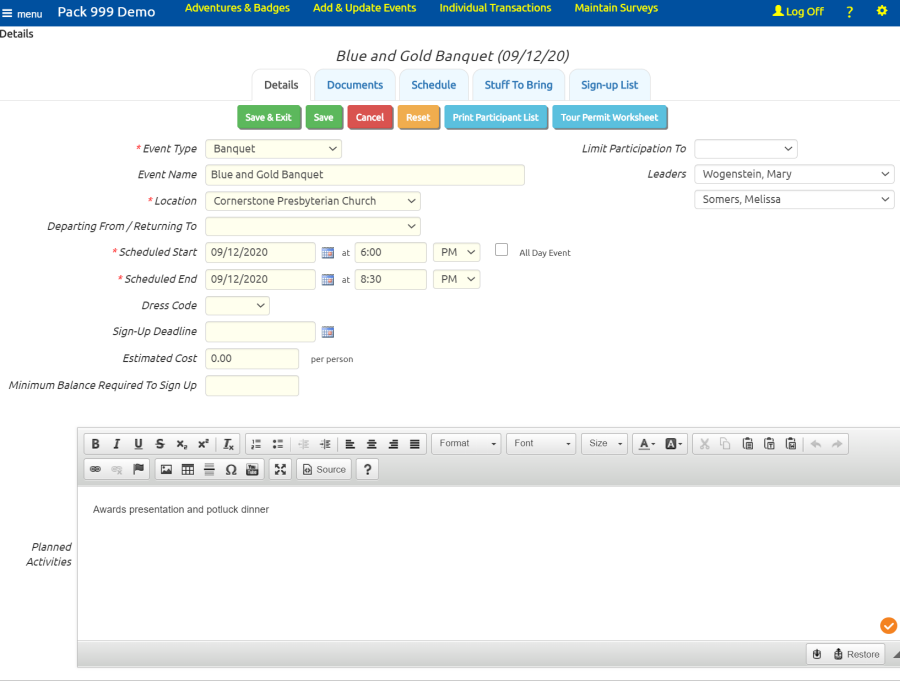
This page has several tabs that allow you to enter information about this event. The first tab is "Details".
The Event Type categorizes this event. It also determines which fields will be available on this event, as configured in the Event Type table.
The Event Name is optional, but should be used when the Event Type is not sufficiently descriptive.
The Location should always be the destination for this event. If you are leaving from a drop-off location, like your regular meeting place, select that location in the Departing From / Return To field. For events that do not require travel, you may leave the Departing From / Return To field empty.
The Scheduled Start is when you expect everyone to be at the departure location. The Scheduled End is when you expect to return to that location.
The Dress Code lets you select a value that you've configured in the Dress Codes table.
The Sign-up Deadline allows you to prevent users from signing up for this event after the specified date. If you enter a date in this field, users will not be able to sign up for this event from the My Stuff menu or the Group Calendar after this date. You will still be able to update the planned attendance from the Sign-Up List tab (shown later on this page).
The Estimated Cost is for informational purposes only. It does not have any effect on the accounting system.
The Minimum Balance Required To Sign Up overrides the minimum balance that was configured for this event type. Members who have less than this amount in their account when they try to sign up will be prevented from doing so. Please note that this number can be negative; if you use a negative number then only those members who are already in arrears will be prevented from signing up for an event.
You can select a dynamic subgroup from the Limit Participation To dropdown list to restrict attendance to the current members of that subgroup. Cub scouts will find this useful for den meetings.
You can select the leaders for this meeting from the Leaders drop down lists.
The Planned Activities will be visible to everyone in the pack on the Calendar and the Automated Newsletter, so make it friendly and informative.
You can save your work on any of the tabs by clicking on another tab, or by hitting the Save or Save & Exit buttons.
The second tab lets you upload documents to this event.
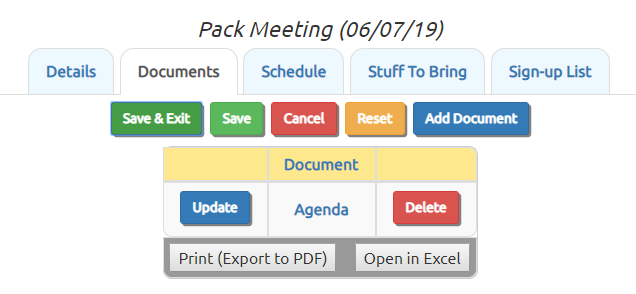
You can upload as many documents as you'd like to each event. Click Add Document to begin adding a document.
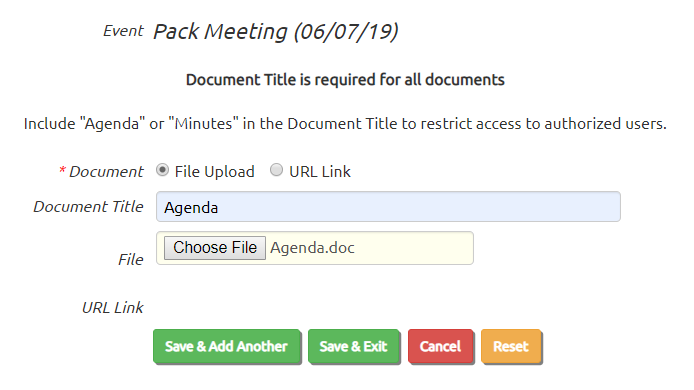
You can select "File Upload" to upload a file, or "URL Link" to reference an existing file on the web. In either case, you must enter a Document Title. If you include the word "Agenda" or "Minutes" in the title, it will only be visible to users who are authorized to view the agenda and minutes documents.
Use the File control to select your document from your local drive. The file will not upload until you click one of the Save buttons.
If you are linking to an existing file on the web, enter the complete URL in the Link URL field, beginning with either http:// or https://.
The third tab lets you schedule the activities for this event. It can also be used to enter the menu for each meal.
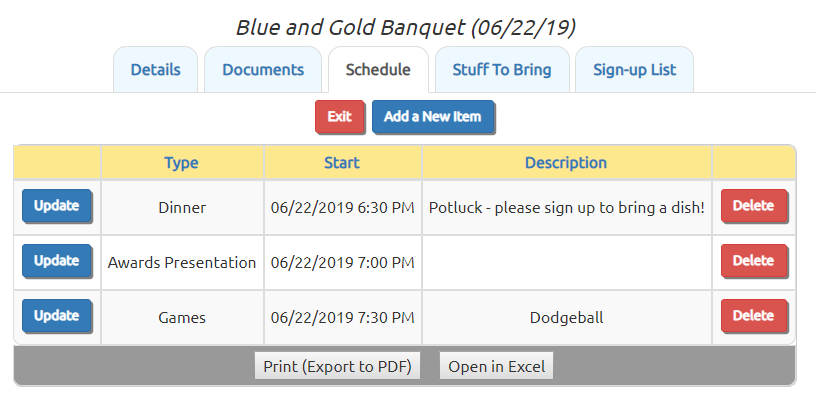
When you add an activity, if the drop down list for Activity Type is empty, please go to Site Configuration → Activity Types to populate the list.
The fourth tab, "Stuff To Bring", is where you can ask members to sign up for things that will be needed.
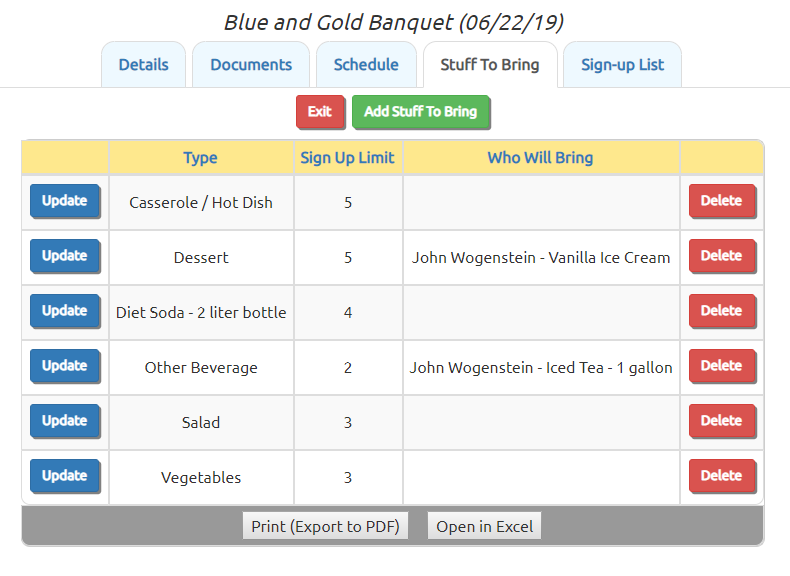
This can be used to request snacks and drinks for den meetings, or specific types of food for potluck dinners. It can also be used to ask for craft materials or equipment that you'll need for a particular program.
The Sign-Up Limit will limit the number of members who can sign up for a given item from the Calendar, but will not prevent you from adding as many volunteers as you'd like from this page.
The fifth tab, "Sign-up List", allows you to update everyone's participation plans.
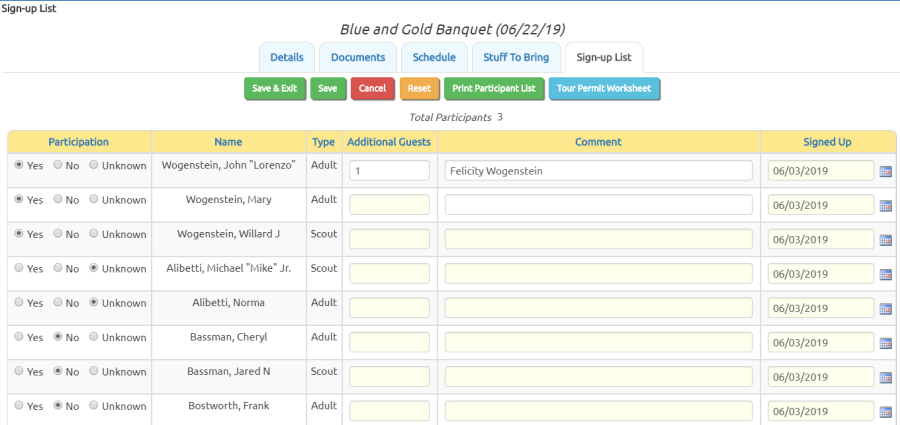
After the event is over, you can use this page to note who actually attended; you can also use the Take Attendance pages for that purpose.
Click Print Participant List to produce a report which lists the members who plan to attend.
Click Tour Permit Worksheet to produce a detailed report about this event.
At the bottom of the page you will find two more buttons, which should only be used AFTER you have saved any changes to the sign-up list:
- E-Mail Participants to initiate an e-mail to everyone who has signed up for this event.
- Invite Undecideds to send an e-mail invitation to anyone whose status is still "Unknown".
If this event has an Event Type that is configured to allow shifts, you will also see a "Shifts" tab. This will be explained on the next page.
Shifts
An event can have shifts. This is useful for fundraisers, like Christmas tree sales, when you need to staff your sales location over a period of days or weeks, or for pancake breakfasts or spaghetti dinners, where you need to staff cooking crews, servers, and clean up crews for different times.
 The Event Type determines whether an event can have shifts.
You may want to create new Event Types for events that have shifts, if your system does not already have these set up.
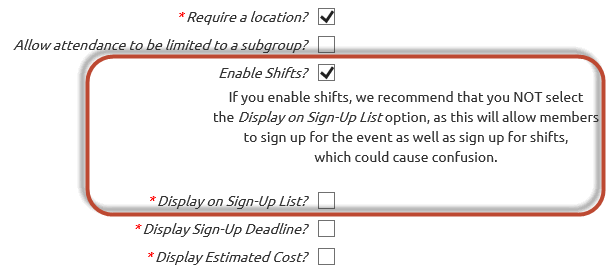
To do this, go to Site Configuration → Event Types, click Add a New Item, and begin selecting the options, as shown at right.
Select the Enable Shifts? option to allow this type of event to have shifts.
We recommend that you do not select Display on Sign-Up List? for events with shifts.
You can select Display Sign-Up Deadline? for events with shifts, which will limit when your members will be able to sign up for these shifts.
Once you have Event Types that support shifts, you can create an event with Add and Update Events and select one of those event types.
When you arrive at the detail page you'll notice that there is a sixth tab, "Shifts".
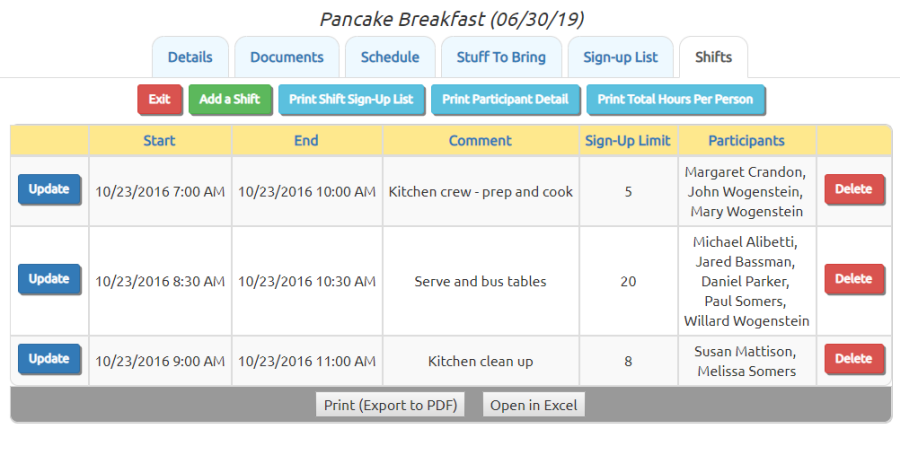
Click Add a Shift to begin adding a shift.
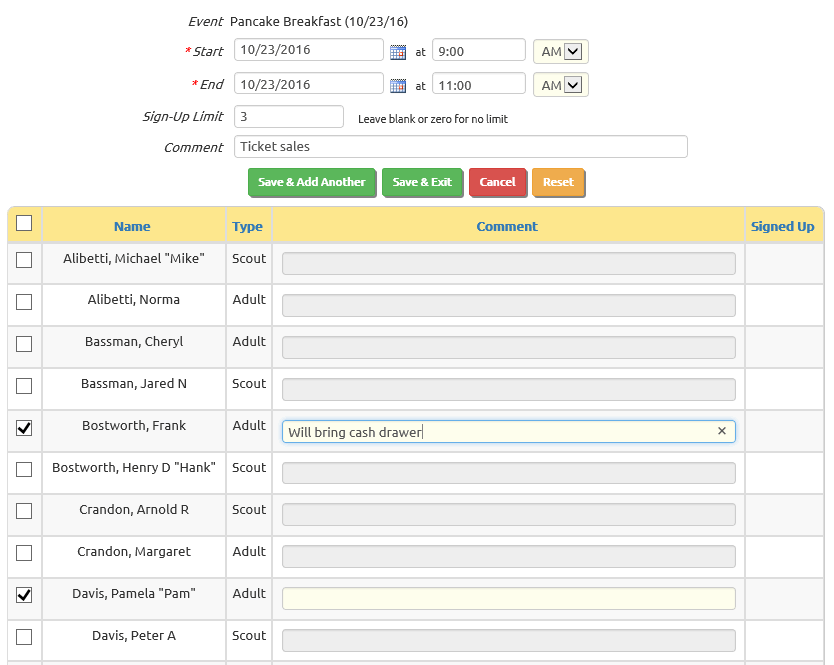
The Start date and time are when the shift is scheduled to begin, and the End date and time are when it ends.
The Sign-Up Limit value will limit the number of members who can sign up for this shift on-line. Once the limit is reached, users will no longer see this shift when they try to sign up for shifts. Users authorized for the Add and Update Events function will be able to override these limits. Leave this field blank or set it to zero if you do not want any limits.
The Comment will be displayed when a member views the shifts that are available.
Note that you can sign up members for this shift on this page by clicking the checkbox next to their name.
Click Save & Exit to save your work, or Save & Add Another to save it and begin another shift.
Once you've defined the shifts for an event, your members can sign up for shifts and you can create reports showing who is scheduled for each shift.
Copy An Event
Your group's regular meetings should always be on your calendar. But entering an event for each meeting would take a long time and be really boring.
Instead, why not create the first meeting and then copy it into future dates? That's what I'm talking about.
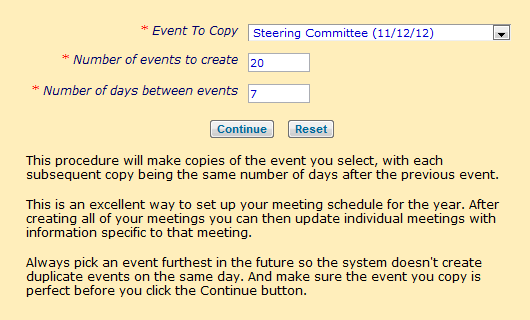 Select Copy An Event from the Events menu to see a page like the one shown at right.
Before you do this, you must have already created the first event using Add and Update Events.
Your first event should not have any information in it that you do not want to copy into the new events.
Select that event in the drop down list.
Then select the number of events you want to create. We recommend that you not copy weekly events more than six months into the future. Having a large number of future events in your system will make it harder to maintain your calendar.
The number of days between events should be 7 for weekly meetings.
When you click Continue, the system will copy the selected event as many times as you told it, always adding the number of days you indicated to the starting and ending dates.
For example, if you select an event that has a scheduled start of May 1, with 7 days between events, the first new event would be May 8, the next would be May 15, and so on.
Be careful! There is no undo function, so if you make a mistake you will have to manually delete all of the events you created.
Copy Monthly Event
The Copy Event function is very useful when you need to create a series of events that are always separated by the same number of days, like weekly or bi-weekly meetings.
But what if you need to copy an event that happens once a month, or once a quarter?
That's where the Copy Monthly Event function comes in handy.
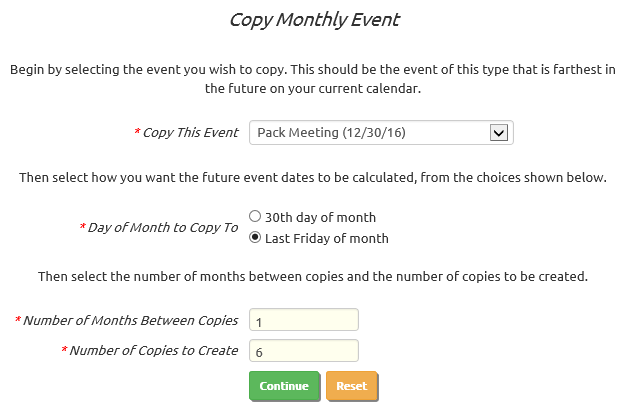 Select Copy Monthly Event from the Events menu to see a page like the one shown at right.
Before you do this, you must have already created the first event using Add and Update Events.
Your first event should not have any information in it that you do not want to copy into the new events.
Select that event in the drop down list.
Then tab to the next field. The choices for Day of Month to Copy To should immediately change to match the event that you selected.
Select the pattern you want to use for day of month from the available choices.
Number of Months Between Copies should be set to 1 for events that occur every month. For quarterly events, set this to 3. For semi-annual events, set this to 6. For annual events, set this to 12.
We recommend that you not set the Number of Copies to Create to a value much higher than 12, so you don't overwhelm your calendar with copies of this event.
When you click Continue, the system will copy the selected event as many times as you told it, using the pattern you selected to calculate the day of month on which each copy will be created.
It will then take you to the Add and Update Events page where you can see the events you just created.
Be careful! There is no undo function, so if you make a mistake you will have to manually delete all of the events you created.
National Holidays
Your unit may find it useful to include national holidays on your calendar. If nothing else, it can help you avoid potential conflicts when you're scheduling an event.
TroopWebHost maintains a list of standard holidays that can be imported into your calendar. These include the federally recognized holidays, along with Mothers Day and Fathers Day. (You don't want to forget about Mothers Day!)
You can view this list of holidays by selecting National Holidays from the Calendar menu. This will display a list like this:
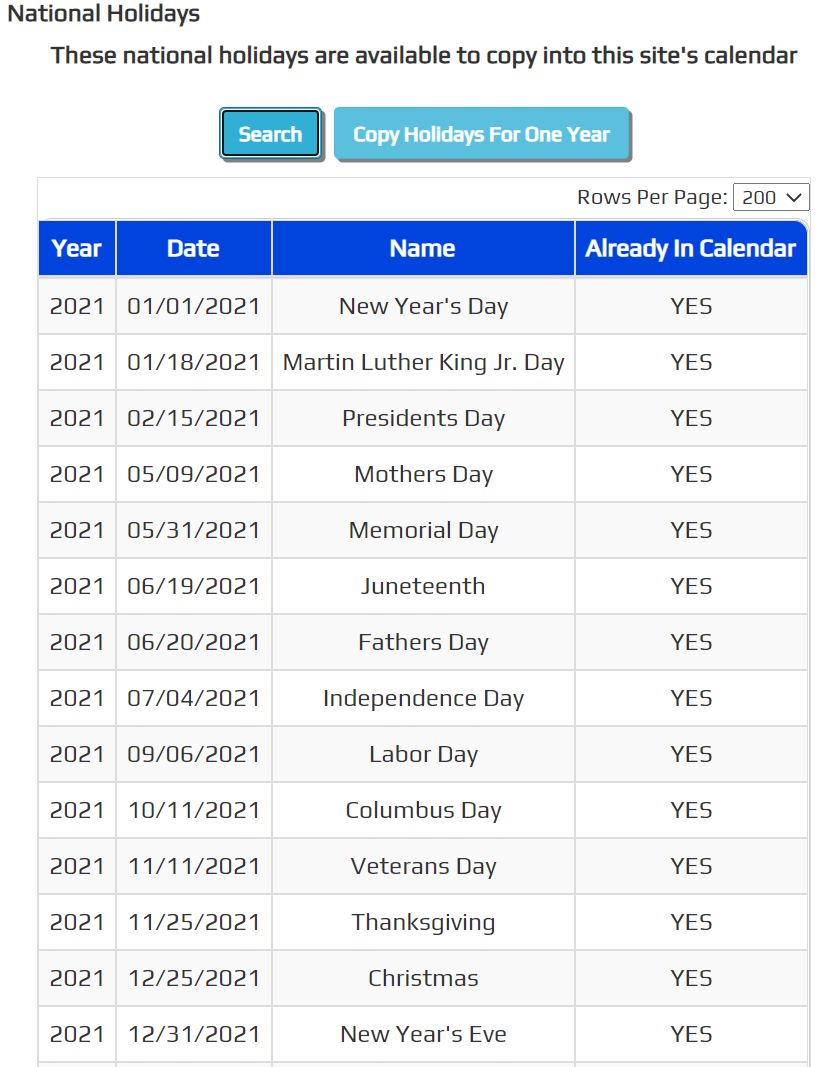
The "Already In Calendar" column indicates whether this holiday is already present in your calendar. This will only be set to "YES" if the event has exactly the same name and date.
Press the Copy Holidays For One Year button to open the following page.
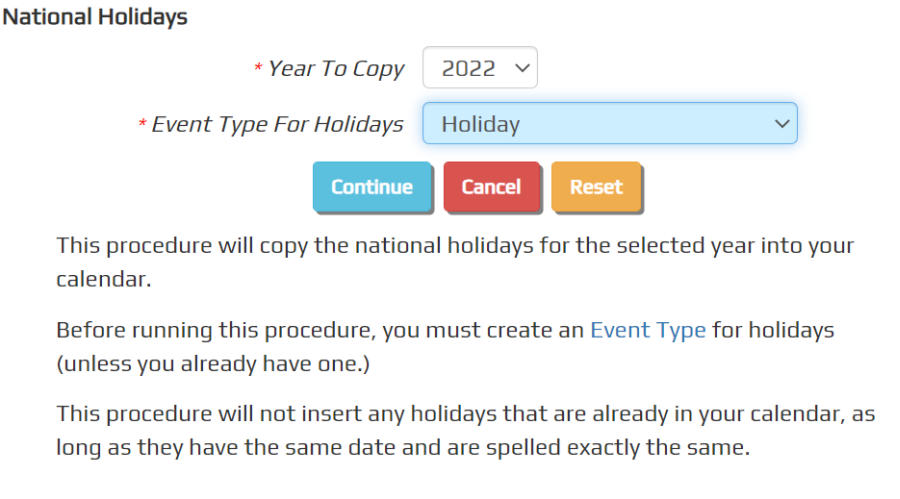
This page allows you to copy the holidays for a selected year into your calendar. It will only copy those holidays that are not already in your calendar with the same exact name and date.
Before running this function, you must first have an appropriate Event Type that can be assigned to these holidays when they are added to your calendar. Please go to Site Configuration → Event Types to add a "Holiday" event type, unless you have already done so. Under "Where These Events Will Be Seen", consider whether you want to include this event type in the iCalendar Subscription or Newsletter. We recommend that you disable all of the options under the rest of the sections.
Once you have a "Holiday" event type, you can return to the page shown above and select that event type from the drop down list. Then press the Continue button to copy that year's holidays into your calendar.
Once this is complete, the system will display the Add and Update Events page.
Take Attendance For Events
Your group may want to record attendance at events to have a future record of who was present. You can take attendance for events by going to Events → Take Attendance For Events.
You can choose an event to take attendance for from a list similar to the one below.
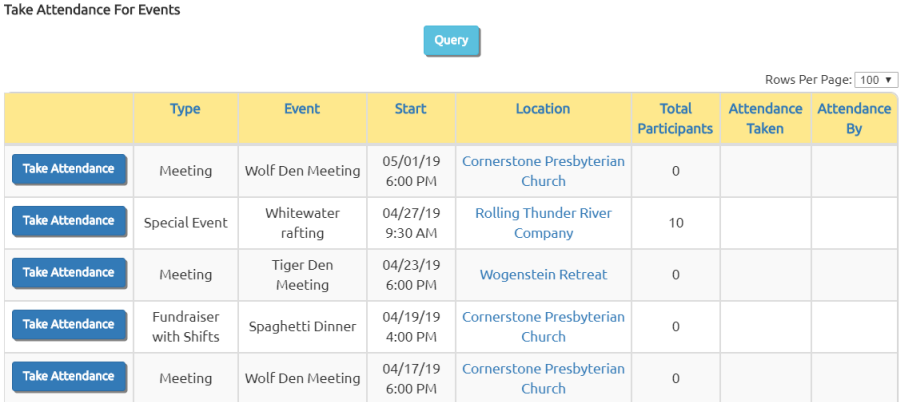
This page will only show events with a start date in the past. Click the Take Attendance button for the event you wish to update.
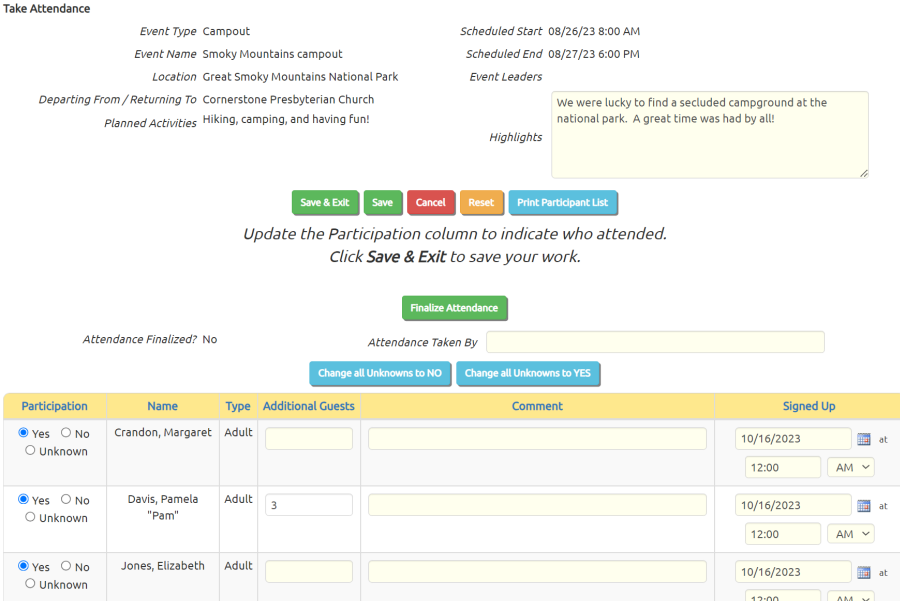
Click the Yes button next to each member who attended the event. If members signed up for an event in advance, this button may already be selected; if they did not show up, you should click the No button.
Enter your name in Attendance Taken By, then click the Finalize Attendance button when you are sure this list is accurate.
Different events will allow you to enter different information based on their Event Type. The settings for each Event Type can be configured on the Event Types page.
Take Attendance For Shifts
Once a Shift has started, you can take attendance for that shift by selecting Take Attendance For Shifts from the Events menu.
This will display a list of recent shifts.
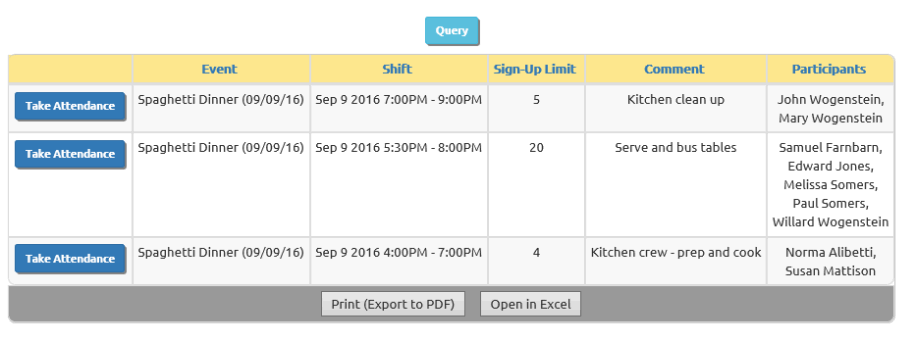
Click Take Attendance for the shift in question to see a page like this:
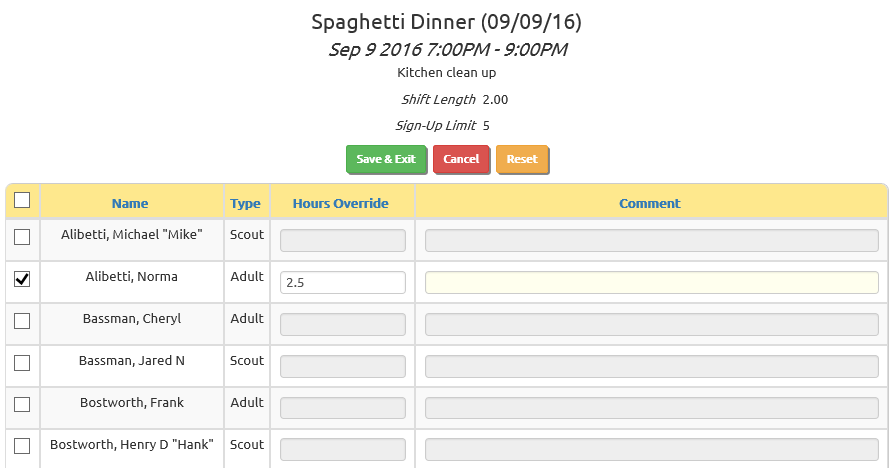
Make sure the checkbox is checked for each member who performed this shift.
Make sure it is unchecked for anyone who signed up but failed to show.
If you are tracking hours for this event, like for a community service project, you can use the Hours Override column to change the time reported for any individual who did not work the entire shift, or who worked longer.
Click Save & Exit to save your work.
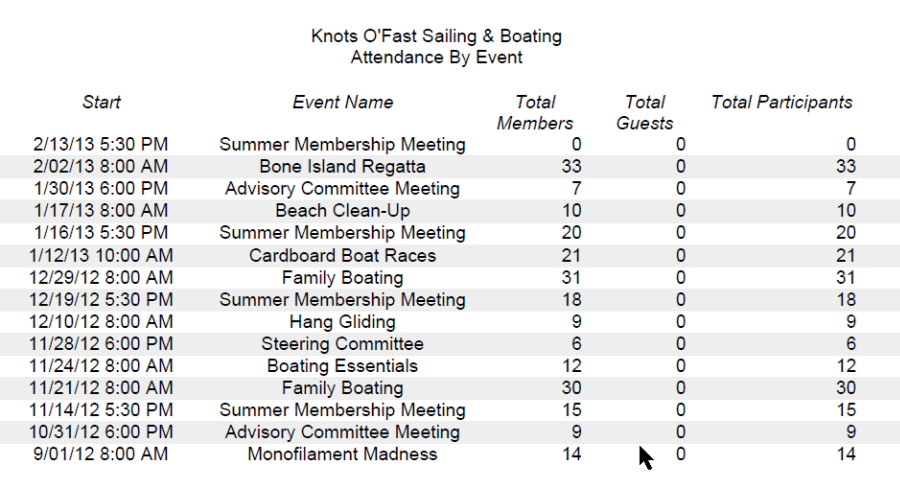
Attendance By Event
The Attendance By Event Report shows all past events, with the attendance at each event.
To produce this report, go to Events → Event Reports → Attendance By Event.
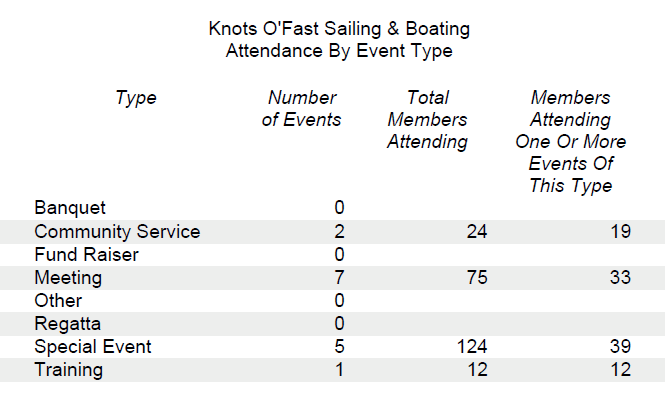
Attendance By Event Type
The Attendance By Event Type Report summarizes attendance at all events over a specified date range, by the type of event.
To produce this report, go to Events → Event Reports → Attendance By Event Type.
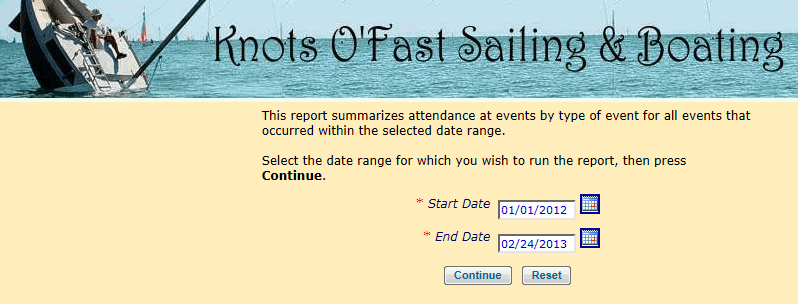
Enter the range of dates for which you wish to run the report, then press Continue.
As shown below, the report lists all of the possible event types.
The Number of Events is the number of events of this type that had a Scheduled Start Date between the starting and ending report dates.
The Total Members Attending is the total attendance at all events of this type within the selected date range. If a member attended two events of this type during the selected date range, he will be counted twice in this column.
The Members Attending One Or More Events Of This Type shows how many members attended any meeting of this type. If a member attended two events of this type during the selected date range, he will be counted once in this column.
Shift Sign-Up List
The Shift Sign-Up List report shows all of the shifts for a given event, and lists the people who have signed up for each shift (if any).
It can be selected from the Shift tab of the Add & Update Events page. Authorized users will also be able to select it from the Calendar detail page.

Shift Participant Detail
The Participant Detail report shows the people who are participating in shifts on a given event.
It can be selected from the Shift tab of the Add & Update Events page. Authorized users will also be able to select it from the Calendar detail page.
Shift Total Hours Per Person
The Total Hours Per Person report shows the total number of hours worked by members on shifts for a recent event.
It can be selected from the Shift tab of the Add & Update Events page. Authorized users will also be able to select it from the Calendar detail page for events that occurred in the past.
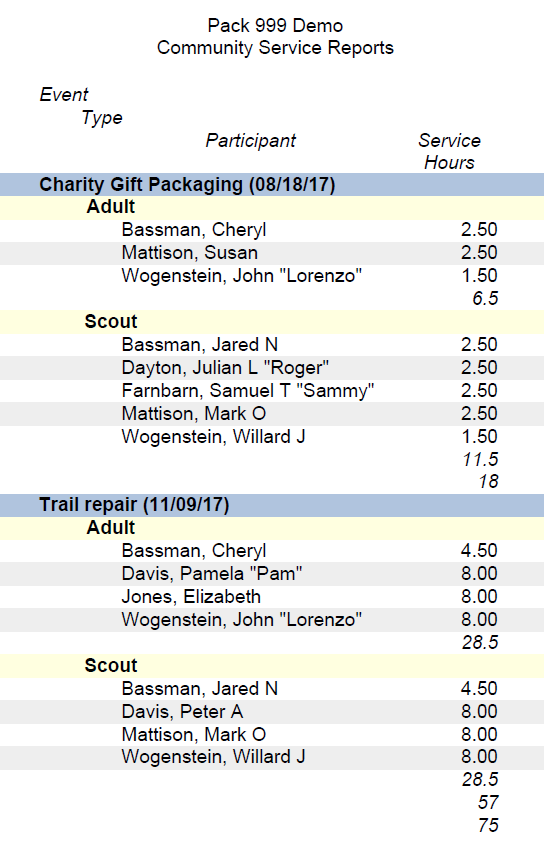
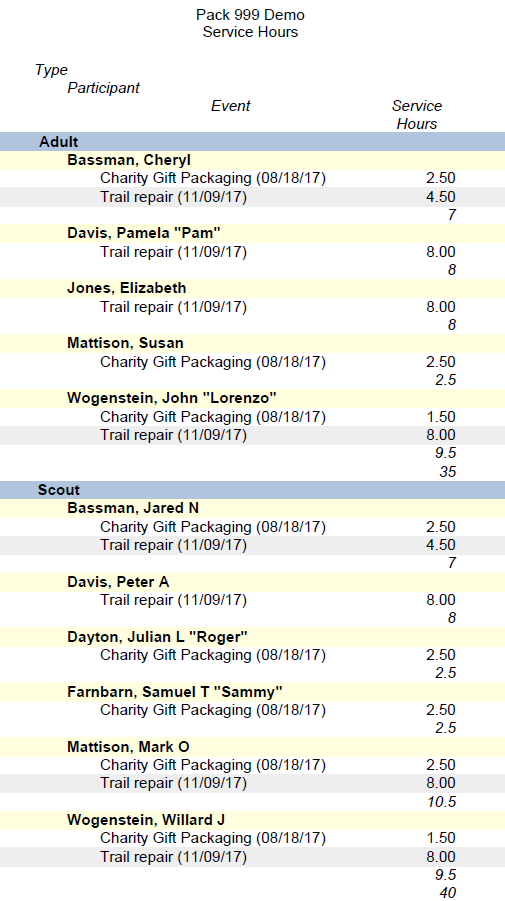
Community Service Reports
The Community Service Reports summarize the hours your members have spent on community service projects in a given period of time.
To produce this report, go to Events → Event Reports → Community Service Reports.
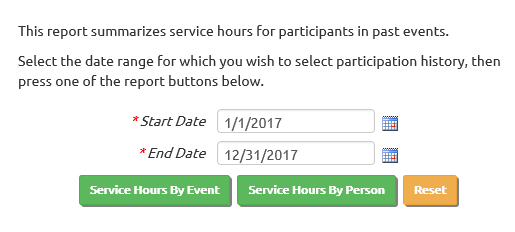
Enter the range of dates for which you wish to run the report, then press the button for the version of the report you wish to see.
The Service Hours By Event button will produce a report that looks like this:
The Service Hours By Person button will produce a report that looks like this:
Upload Events From Scoutbook
Using the Feature Assistant Extension for Scoutbook, it is possible to export the events from your Scoutbook calendar to a CSV file. You can find detailed instructions here.
Be sure to save this file directly to disk. Do NOT open in Excel or a similar spreadsheet program. Saving the file from Excel may change the format in a way that could cause the upload to fail.
To upload this file, please open the main menu to Events → Upload Events → Upload Scoutbook Events.
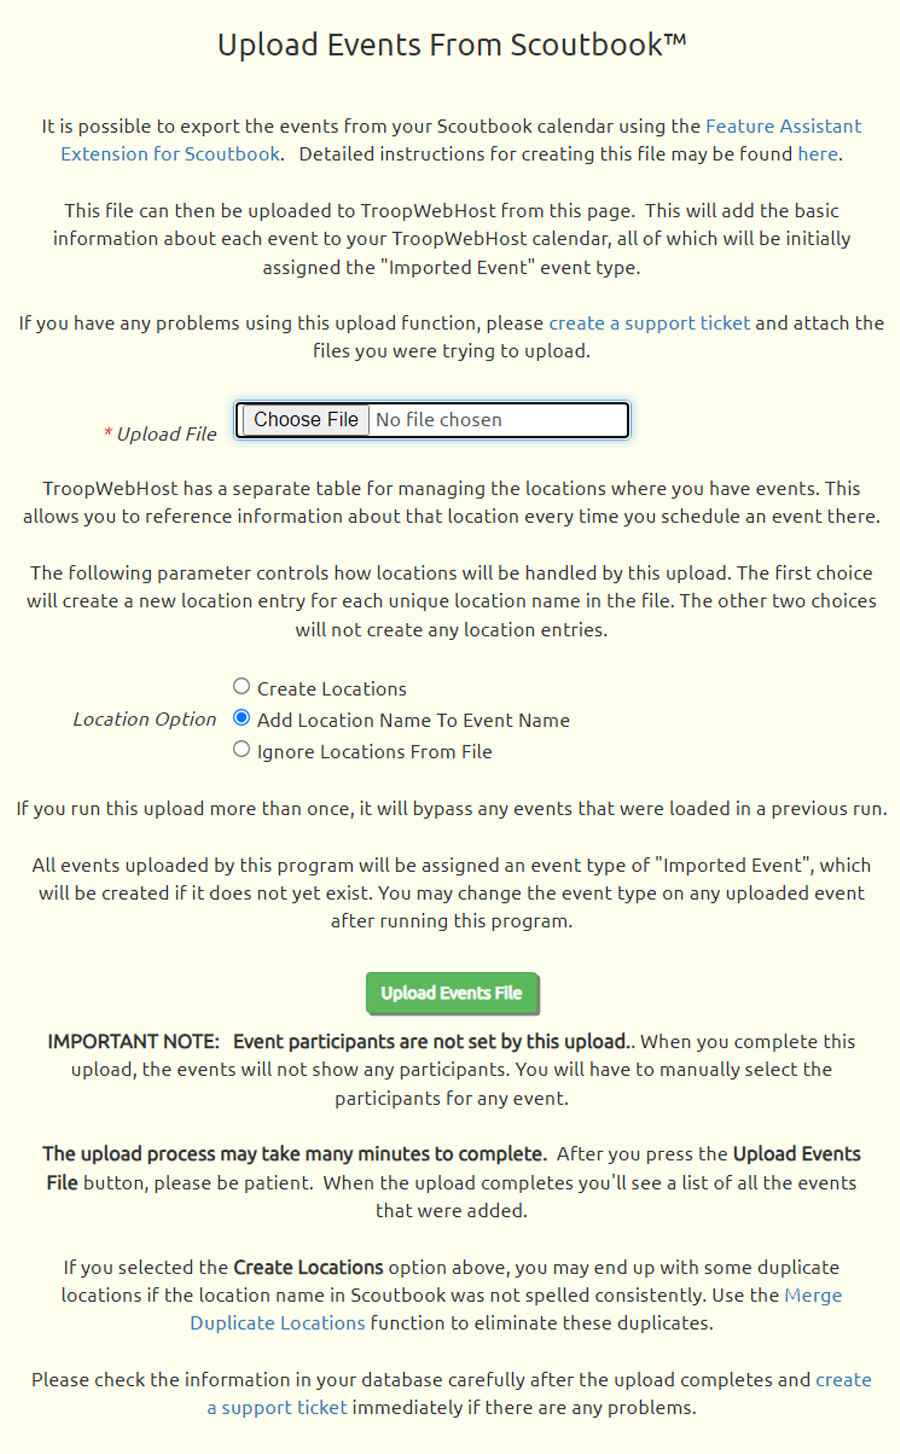
Click the Choose File button to find the Events file that you exported from Scoutbook.
Unless you were very consistent about how you entered locations in Scoutbook, we recommend that you NOT select the first Location Option: "Create Locations". This will create a new Location record in TroopWebHost for each unique location name found in the file. If the same location was entered in many different ways, this could create a lot of duplicate entries that will take a lot of time to clean up.
Click the Upload Events File button to begin loading this data into TroopWebHost. This can take many minutes to run, so please be patient and do not exit this page.
When the upload completes, the page will redisplay, this time with information about errors and successes.
If you chose the "Create Locations" option, it will add entries to the Locations table. You can eliminate any duplicate locations with the Merge Duplicate Locations function.
If it did not already exist, the program will create an event type "Imported Event", which will be assigned to all of the events that it uploads. You may want to change the event type of each of these events to something more appropriate.
This upload will not populate the participant list for each event.
Upload Events File From SOAR™
SOAR was a popular, easy to use scouting software platform that shut down unexpectedly in March of 2023. It provided basic membership, calendar, and email capabilities.
When SOAR failed, they were able to provide their customers with data files that could be used to migrate to TroopWebHost. The SOAR Events file can be used to populate your TroopWebHostCS calendar.
This file is contained in a zip file that was distributed from SOAR. It must be extracted from the zip file before it can be uploaded using the function described here.
To upload this file, please open the main menu to Events → Upload Events → Upload SOAR Events.
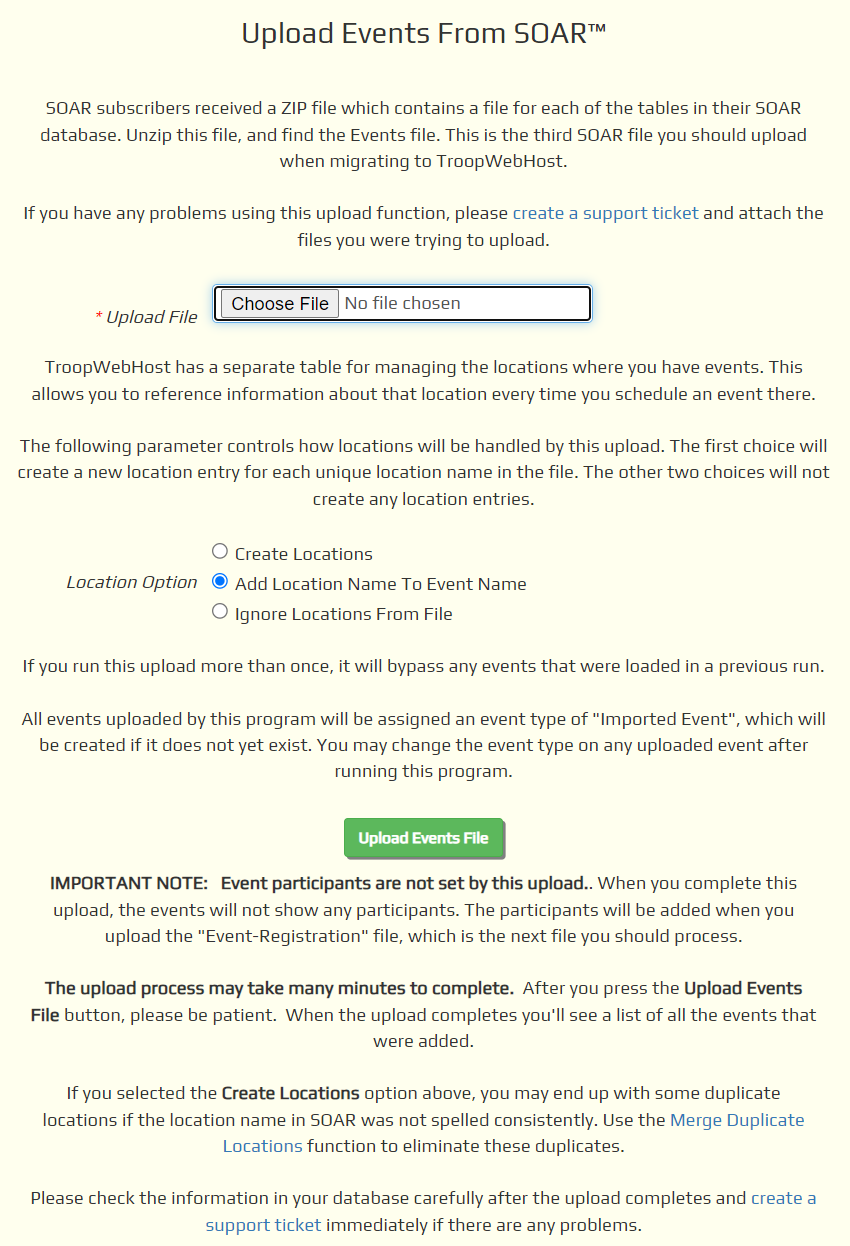
Click the Choose File button to find the Events file that you extracted from the SOAR zip file.
Unlike TroopWebHost, SOAR did not have a separate Locations table. You simply entered the location into a free text field, which means that the same location could have been entered in a variety of ways.
Unless you were very consistent about how you entered locations in SOAR, we recommend that you NOT select the first Location Option: "Create Locations". This will create a new Location record in TroopWebHost for each unique location name found in the file. If the same location was entered in many different ways, this could create a lot of duplicate entries that will take a lot of time to clean up.
Click the Upload Events File button to begin loading this data into TroopWebHost. This can take many minutes to run, so please be patient and do not exit this page.
When the upload completes, the page will redisplay, this time with information about errors and successes.
If you chose the "Create Locations" option, it will add entries to the Locations table. You can eliminate any duplicate locations with the Merge Duplicate Locations function.
This upload will not populate the participant list for each event. That will happen when you upload Event-Registration, which is next.
Upload Event Registration From SOAR™
The SOAR Event-Registration file identifies the participants at each event. This file was distributed by SOAR in a separate folder from the zip file that contained the other files.
To upload this file, please open the main menu to Events → Upload Events → Upload SOAR Event Registration.
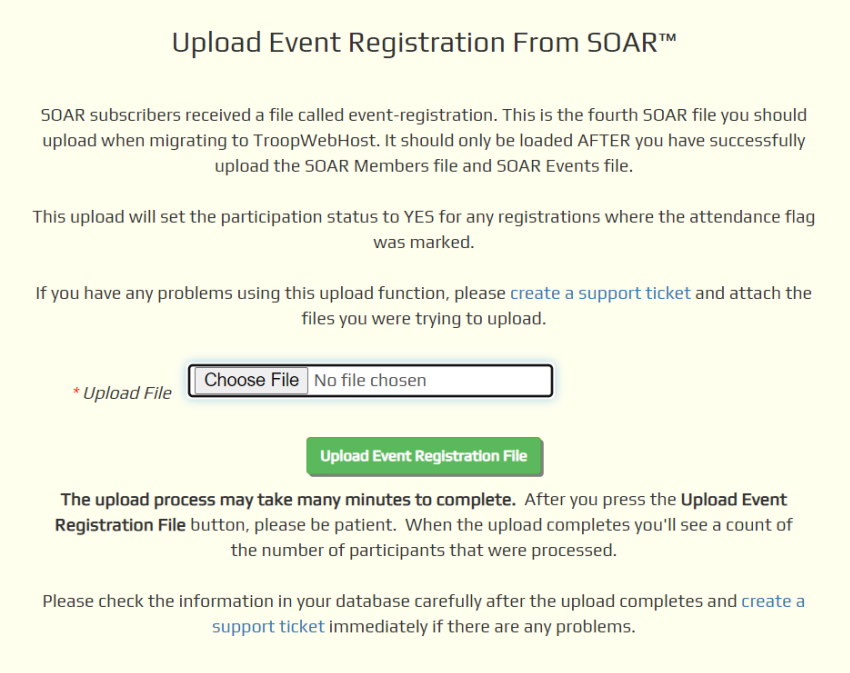
Click the Choose File button to find the Event-Registration file that you received from SOAR.
Click the Upload Event Registration File button to begin loading this data into TroopWebHost. This can take many minutes to run, so please be patient and do not exit this page.
When the upload completes, the page will redisplay, this time with information about errors and successes.
If you had marked a participant as having paid for an event, the comment field for that participant will begin with "Paid.", followed by any other notes that were in the SOAR file.
When you loaded the Person file, we saved SOAR's internal ID for each person in a new field called SOAR ID. When you loaded the Events file, we saved SOAR's internal ID for each event in another field called SOAR ID. The Event Registration file uses those two IDs to link the person to the event.
Activities FAQ
 When I tried to add an activity in the Meal Plans and Scheduled Activities part of the event, the choice list for Activity Type was empty. Why?
You need to define the types of activities you wish to include in your plans. To do this select Activity Types from the Site Configuration menu.
Is it possible to set up recurring events for things like meetings?
Not in the same way that you can schedule recurring meetings in Microsoft Outlook, but you can do the next best thing: you can create a "template" event and copy it forward in time using the Copy An Event function.
Can we make the Group Calendar available to the public without logging on?
When we asked our customers whether the Calendar should be made available to the public, we received some responses in favor and others opposed. However, the groups that were opposed provided some very compelling reasons for keeping the calendar private, and we decided to respect their wishes.
We are concerned that providing detailed information about the times and locations of our customers' events to all unauthorized viewers could potentially create risks to their groups' safety. The security of your group's members is our foremost concern, and the secure environment we provide allows them to feel comforable about putting their information online.